|
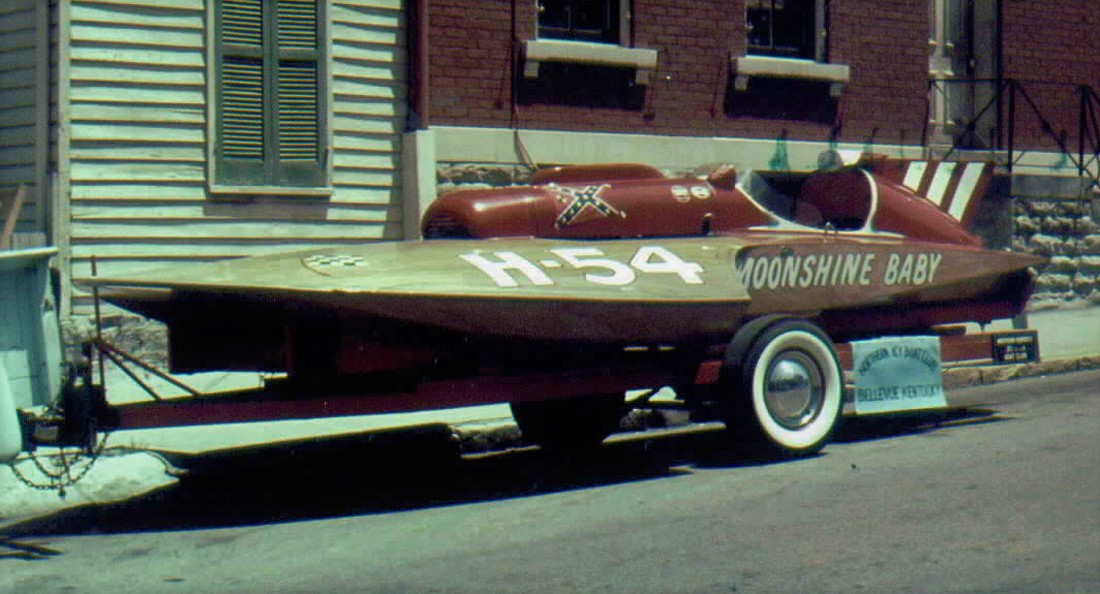
This photo was taken when it was brand new just before the parade and it's first race in Melbourne, Kentucky 1961.
Note - the motor has not been installed.
Photo by Cliff Wartman
This hydroplane was originally built in 1960-61 by Jim Moore with help by the owner/driver Dallas Kremer, both of Bellevue, Kentucky.
The Junior Gold cup boat was started in Jim's basement with the keel bolted to his floor and it was built to a point where they could not add the sponsons
and still be able to get it out the door. It was then moved to Dal's auto shop for completion. The hull was designed by Ted Jones as
a 280 cubic inch class, 16' hydroplane, but the builders modified the existing plans by extending it 3' extra feet and installing
the Ford big block motor to compete in the 7-litre class. This hydroplane competed from 1961 to 1976.
|
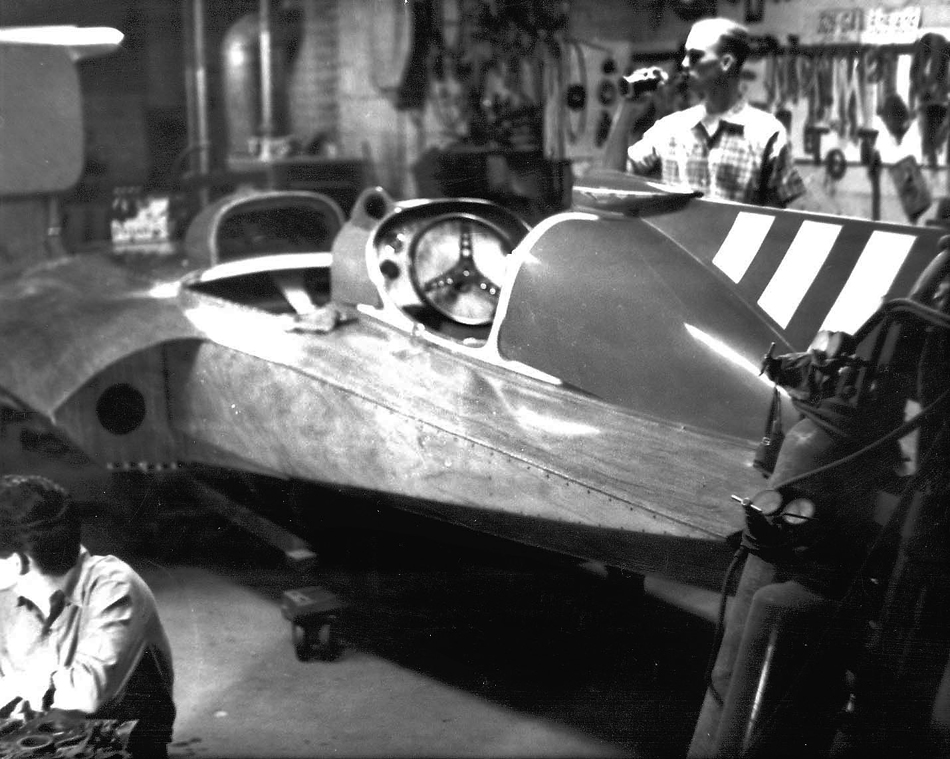
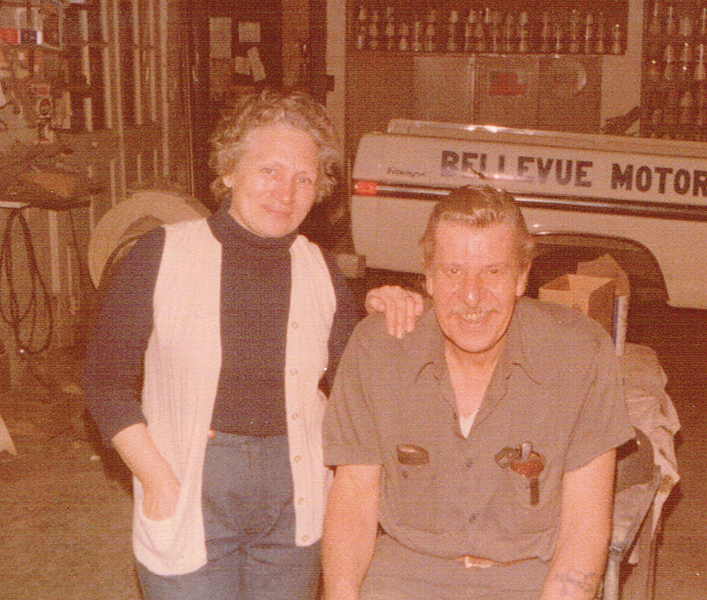
Bellevue Motors Garage
Bellevue, Kentucky 1961
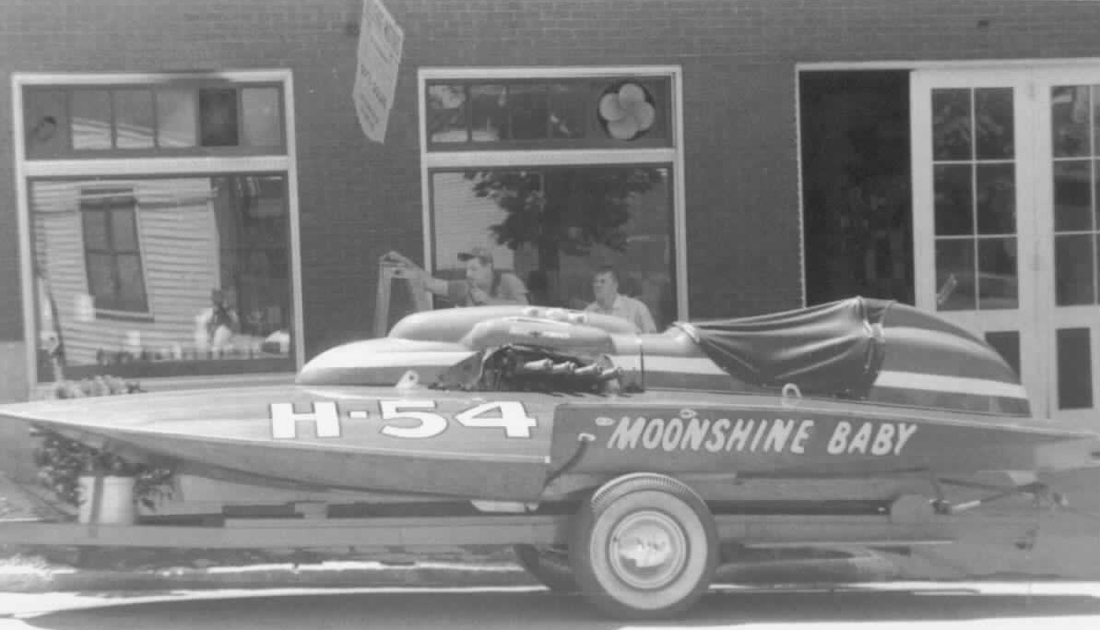
After spending many years running the the 135 cubic inch class Moonshine Baby A-54 , then moving up to the highly successful 280 class, Hallett-built Moonshine Baby E-54, Dallas was excited about running his new 7 Litre hydro Moonshine Baby H-54.
This photo was taken in Dallas & Hazel Kremer's automotive body shop business, Bellevue Motors Garage in Bellevue, Kentucky as the 7-Litre was finished being built.
I found this photo being auctioned on eBay. I bid and won it. The seller of the photo had no idea where he got it from. I sent a scan to Moonshine Baby crewmember, Cliff Wartman who stated it is authentic and recognized the 2 other team members pictured.
...funny how things like this seem to find their way home. |
|
 |
Melbourne, Kentucky 1961
The hydro's first race!
Photo by Phil Kunz |
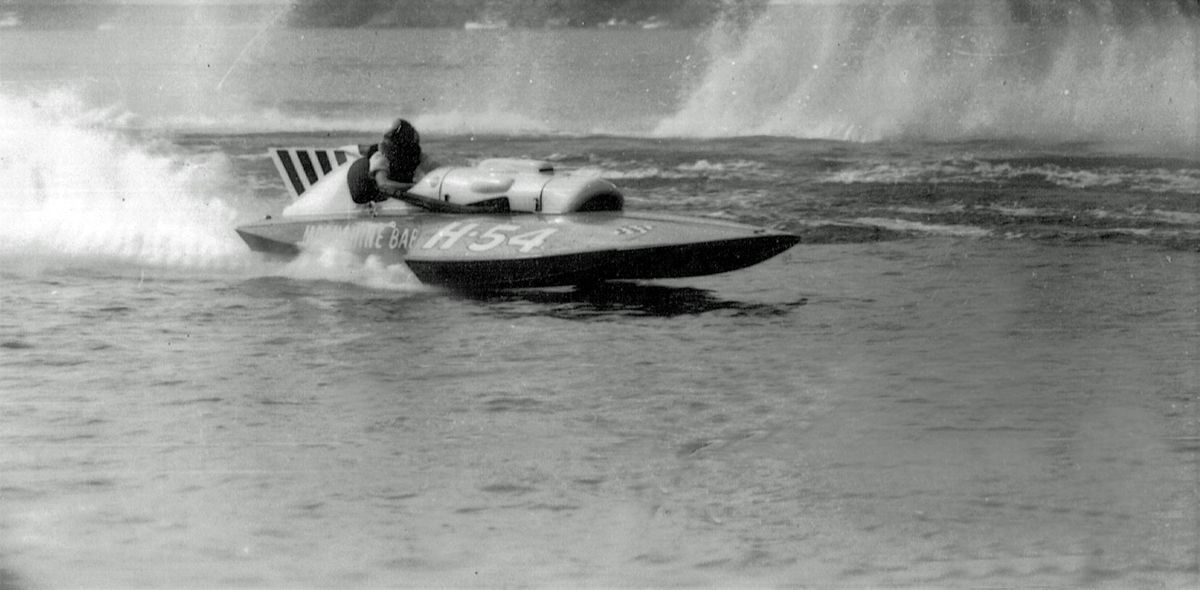
 Charleston, West Virginia 1962 Charleston, West Virginia 1962
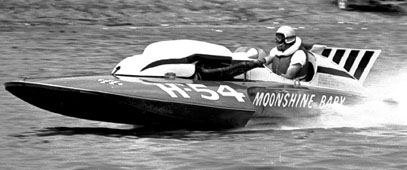
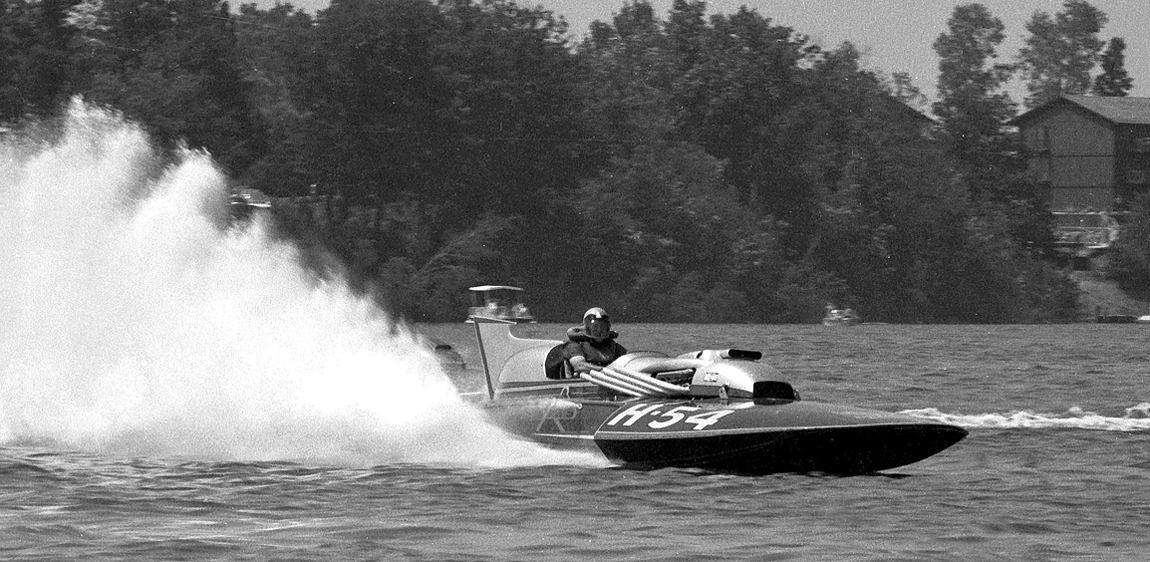
Dallas Kremer piloting the 7-litre H-54
Photo by Phil Kunz
The next summer in 1962, the hull is wearing a new engine cowling.
Plenty of racing action is taking place and each year you will notice the hull will take on new paint and cowling changes.
One of Dallas' goals was to get in the 100 MPH Club and he reached that with H-54 soon after building the hull.
The 7-litre (H) class hydroplane was the largest of the limited inboard classes racing in the early 1960s and referred by as the Junior Gold Cup class.
The 7-litre class motors could not exceed 427.161 cubic inches of displacement which were the big block automotive engines of their day.
This hydro raced its first couple of years using a Ford 390 cid FE motor from a Daytona race car until 1964 when the 427 engines were introduced by Ford.
Click here to read the 1962 American Power Boat Association's 7 Litre class rules.
Madison, Indiana 1962
Photo by Phil Kunz |
Below are some of the race sites H-54 was seen competing at:
KENTUCKY - Melbourne & Newport
ILLINOIS - Ottawa & Kankakee
INDIANA - Madison & Jeffersonville
WEST VIRGINIA - Charleston & New Martinsville
FLORIDA - St. Petersburg
OHIO - Celina, Cincinnati, Columbus, Dayton, New Richmond & Zanesville
NEW YORK - Tonawanda
MICHIGAN - Algonac, Monroe & Detroit
|
 |
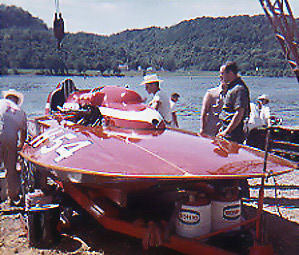
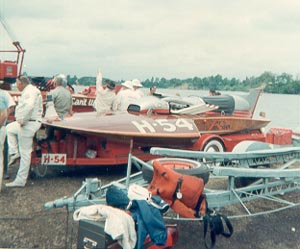
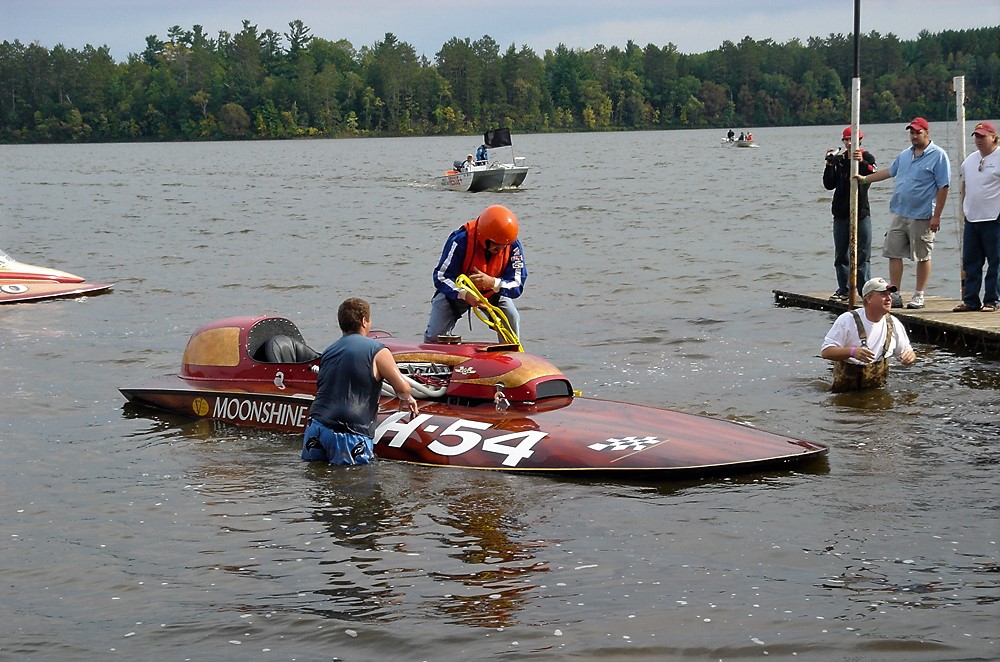
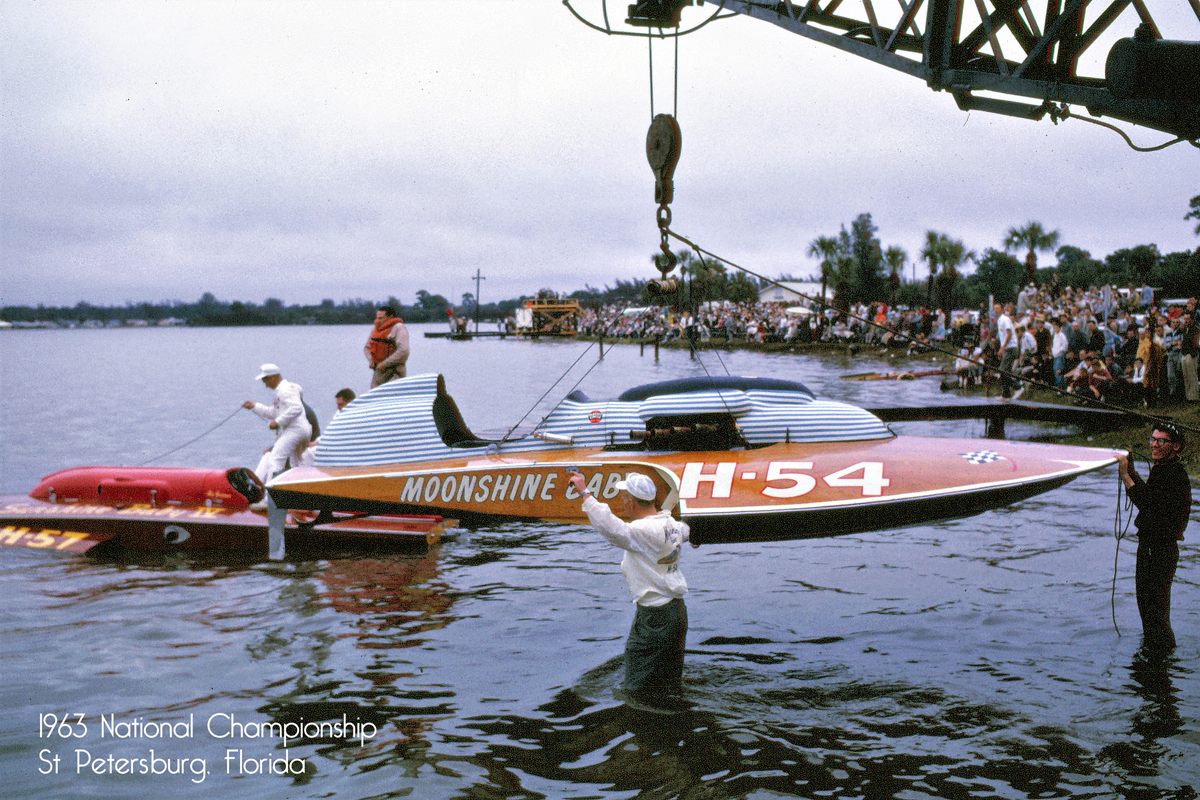 1963 Inboard National Championship Regatta - St. Petersburg, Florida 1963 Inboard National Championship Regatta - St. Petersburg, Florida
Moonshine Baby H-54 being lowered into the water. The red hydro in the background is Ray Gassner's Sunshine Baby H-57.
photo by Phil Kunz
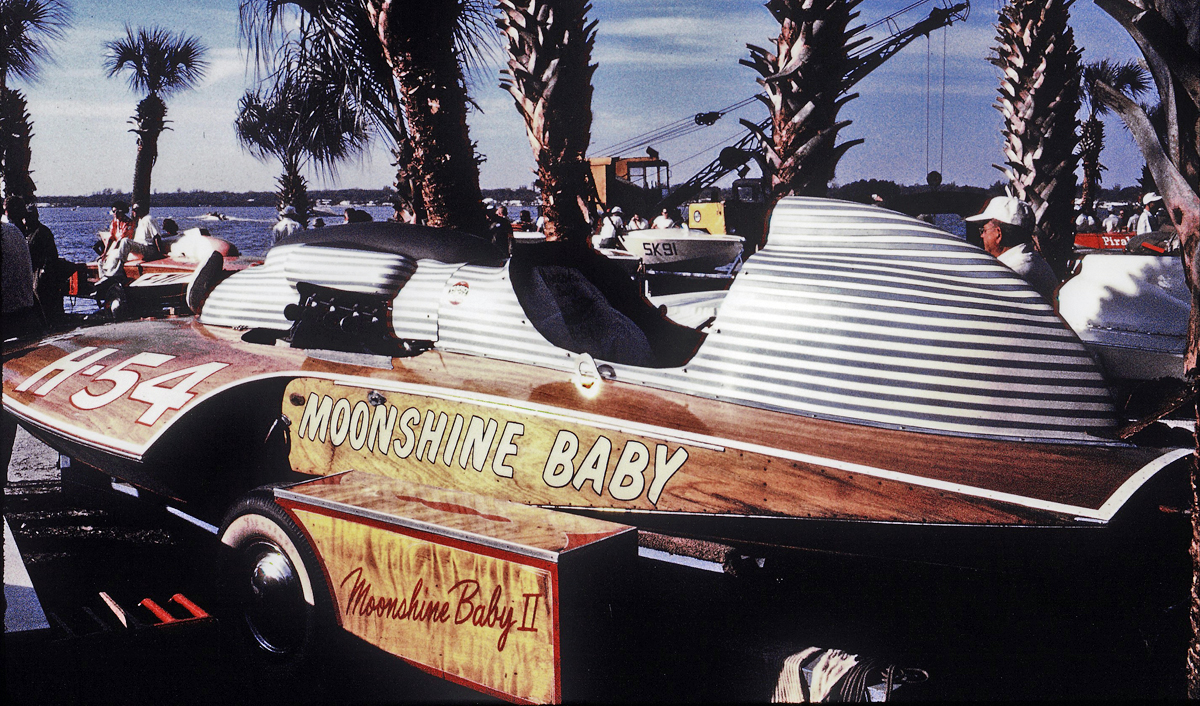
In the pits at the 1963 Inboard National Championship Regatta St. Petersburg, Florida
photo by Phil Kunz
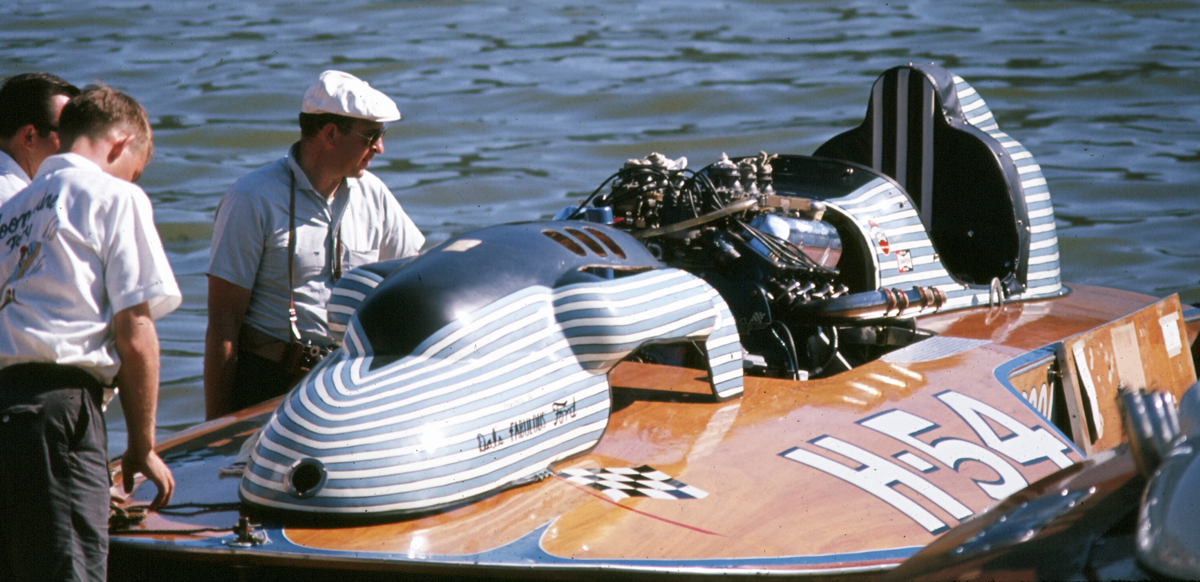
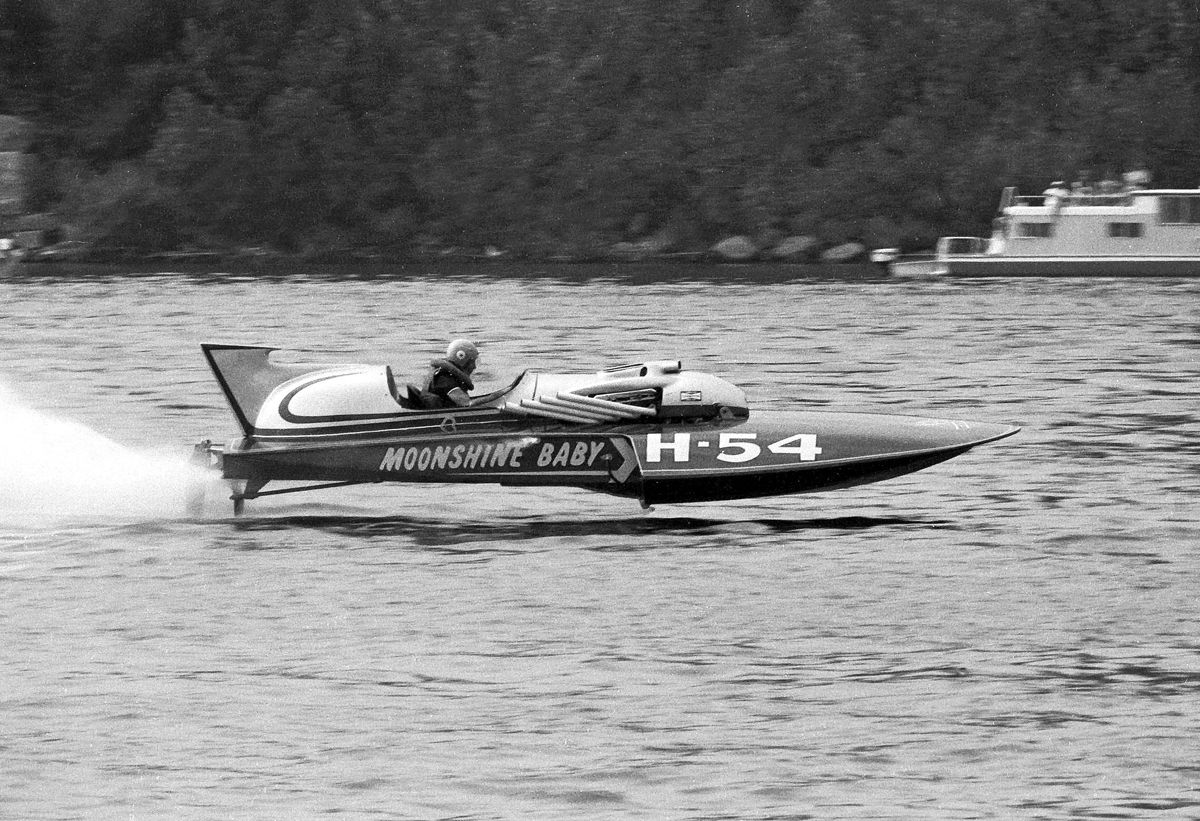
Madison, Indiana 1963
Photo by Phil Kunz
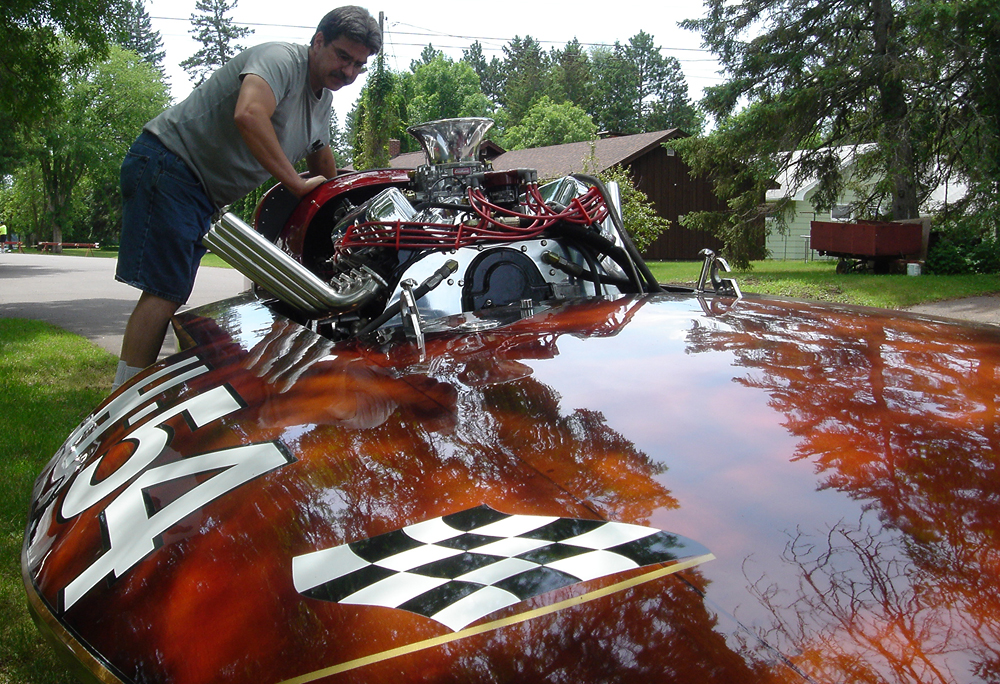
Note the six Stromberg 97 2-barrel carbs sitting on top of the aluminum intake manifold of 'Dals FABULOUS Ford'
as described from the lettering on another set of new cowlings that are now gracing the hull for 1963.
Many changes are taking place each year as the Moonshine Baby team are making adjustments and refining the hull.
Next year, the team will switch to a new Ford 427 and a 10% overdrive gearbox and smaller propeller will be installed to help the hydro come out of the turns more efficiently.
In the early 1960's, most owners were running Chrysler Hemis in the 7-litre class. In 1963, Ford was almost ready to introduce the 427 FE engine (which was born from the 406 racing motor) to compete against the Chrysler 426 Hemi. These motors came stock from the factory with Clevite 77 bearings held in place by 4 bolt cap holders, cap-screw connecting rods and forged-steel crankshaft. The heads were machined combustion chambers and sodium-filled exhaust and hollow stem intake valves. These cross-bolted blocks are reinforced with oil pressure relief in the block and oil pump. They were conservatively rated from the factory at 425 HP. Dallas Kremer and crewman Cliff Wartman, wrote to Ford urging them to get more involved in limited-class hydroplane racing, stating the success they was having with the Ford 390 motor against the Hemi's. As stated by Cliff, " I wrote the original letter to Ford with copies of our newspaper clippings and received the first engine which was a stock 427. All we had to do was run them till they quit and send them back with the records on their performance." Dallas and his crew bolted on the six (6) Stromberg 97 carbs and aluminum flywheel to the motor and went racing. 1960's History in auto racing of the FE engine brought a 1-2-3 in the 1966 LeMans in 427 powered GT-40s, Five Daytona 500 wins, the 427 Cobra's 1965 FIA World Championship and a lock on SCCA racing for years, 428CJ Mustangs dominating the Winternationals at their introduction in 1968, etc.
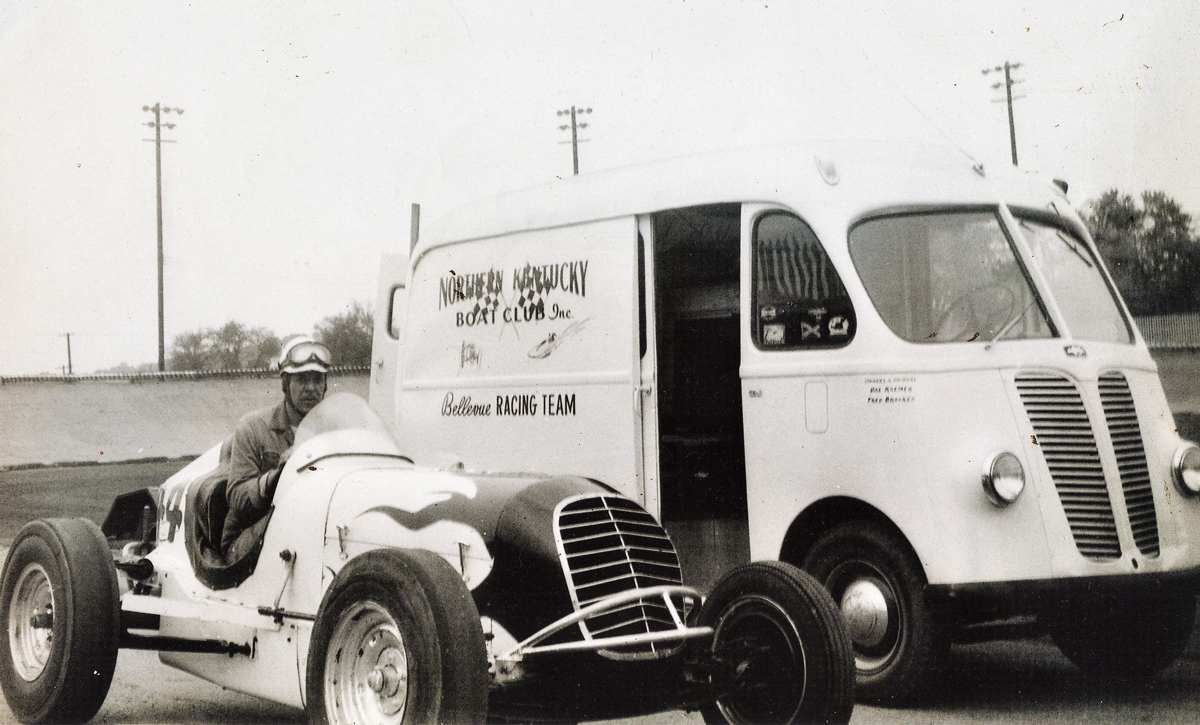
Dallas Kremer was also part of the Bellevue RACING TEAM.
His partner (and brother-in-law) Fred Brocker, Sr. could be seen racing their dirt track sprint car.
1964 Bellvue, Kentucky
photo by Cliff Wartman
Madison, Indiana 1964
Photo by Tom D'Eath
The hydro takes on yet another look this year as a new red deck color replaces the golden stain for the deck skins and new graphics are also added. The cowlings get painted over with a red color and a white stripe is added. Dallas Kremer on the left, and his crew are looking over everything before hitting the course. The chief mechanic for the boats was P.T. (Red) Barrington, who is the the gentleman on the right wearing the hat. The person in the gray shirt is crew member Bill Bohart. Other members of the Moonshine Baby team were Bob Hoh from Dayton, Kentucky who also worked on the engines and is a well known Harley mechanic and Cliff Wartman who crewed from 1955-1964.
|
 |
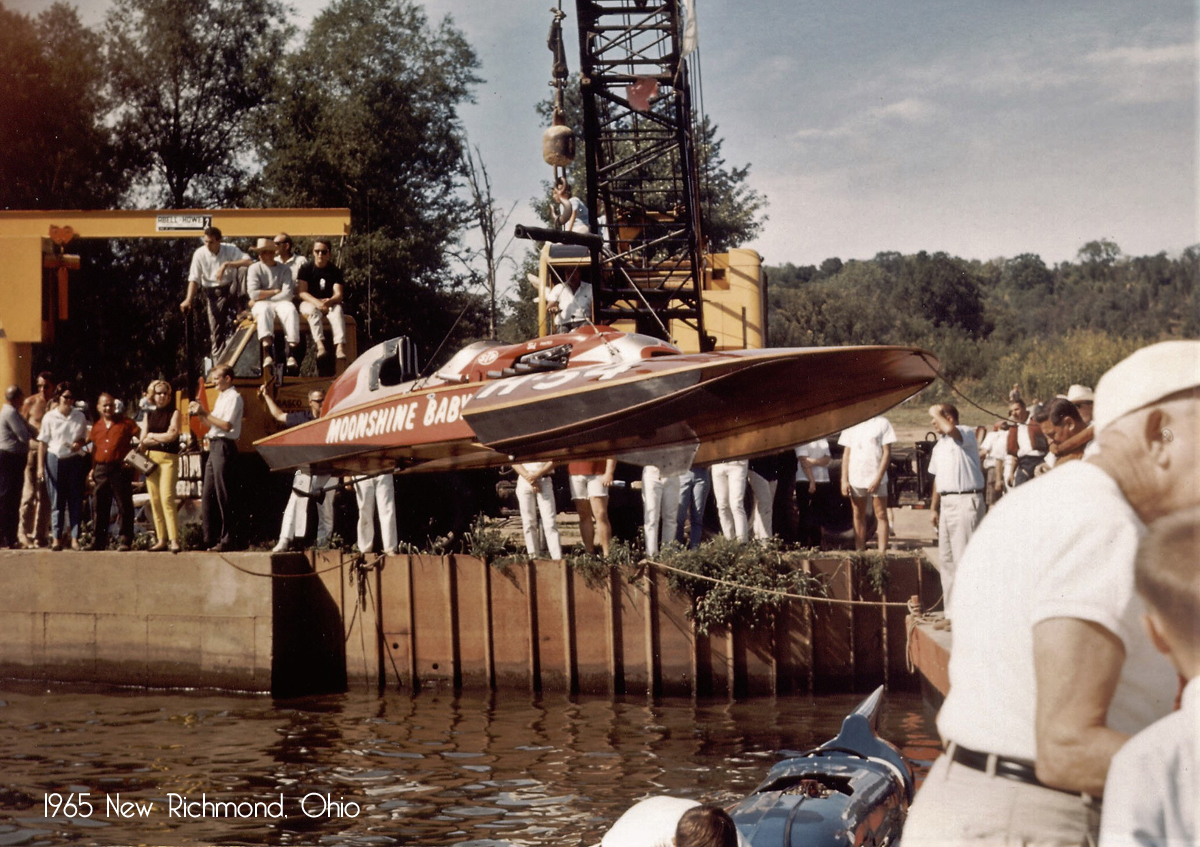
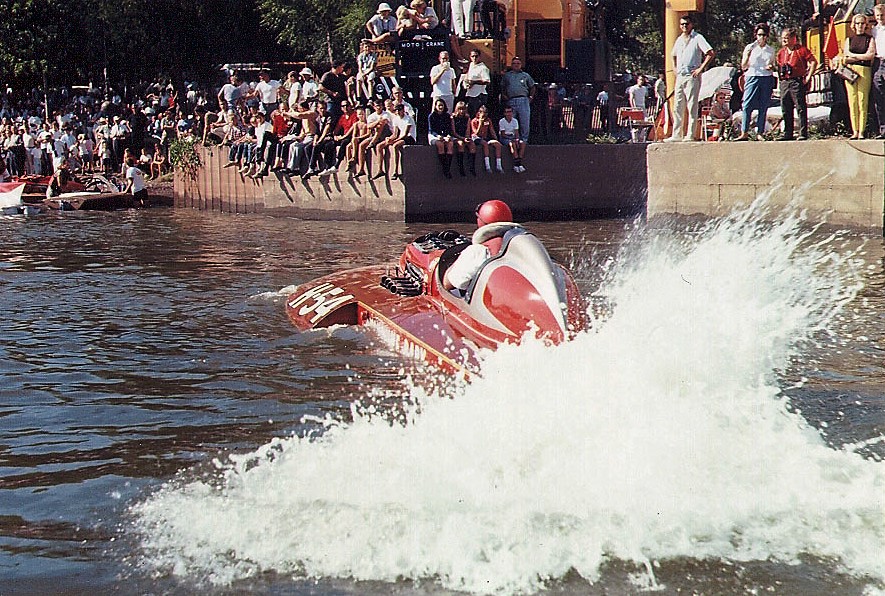
1965 New Richmond, Ohio
above two photos by Moonshine Baby crewmember, Cliff Wartman
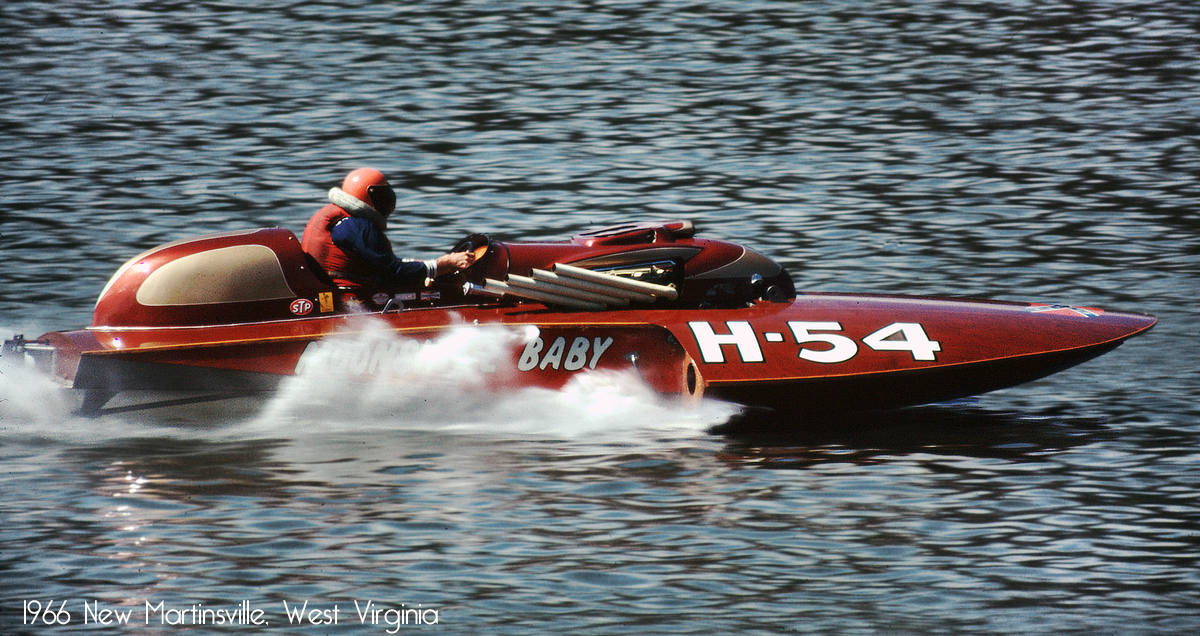
1966 New Martinsville, West Virginia
photo by Phil Kunz
The start of the 1966 season has Moonshine Baby with sporting a new set of cowlings and exhaust headers. New graphics added this year include carrying the Confederate Naval Jack flag painted on the deck. This is the 3rd set of cowlings that Dallas made for this hydro. This set is on the restored hydroplane. Dallas said to me that he liked to work with fiberglass and produced all the different cowlings you see throughout these photos.
1966 Newport, Kentucky
photo by Phil Kunz
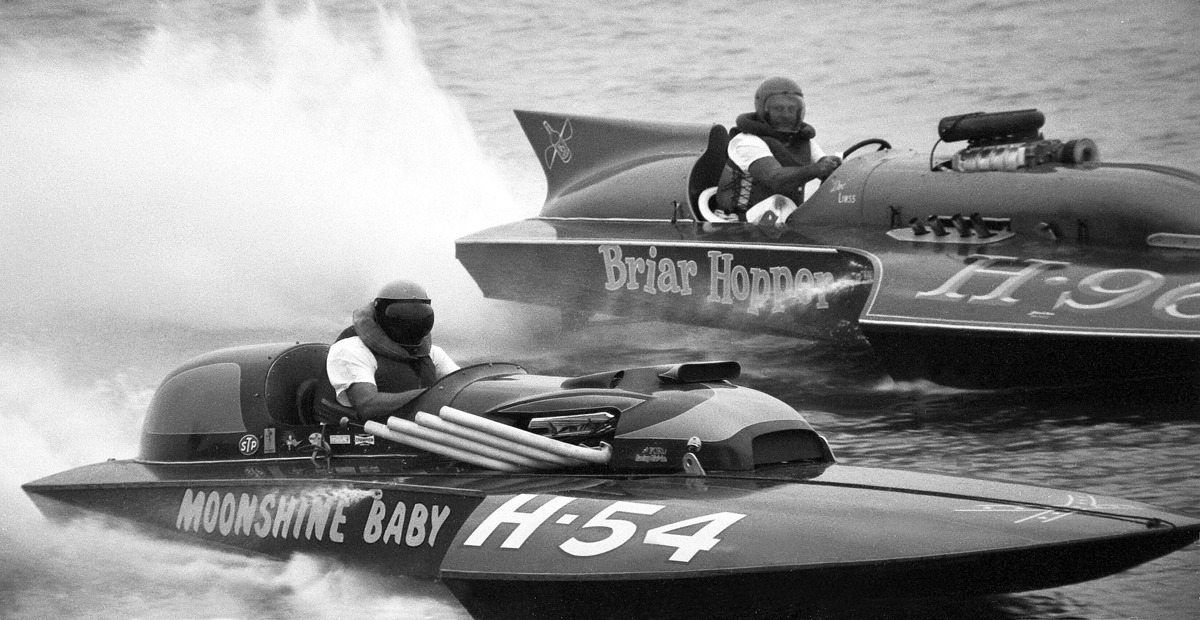
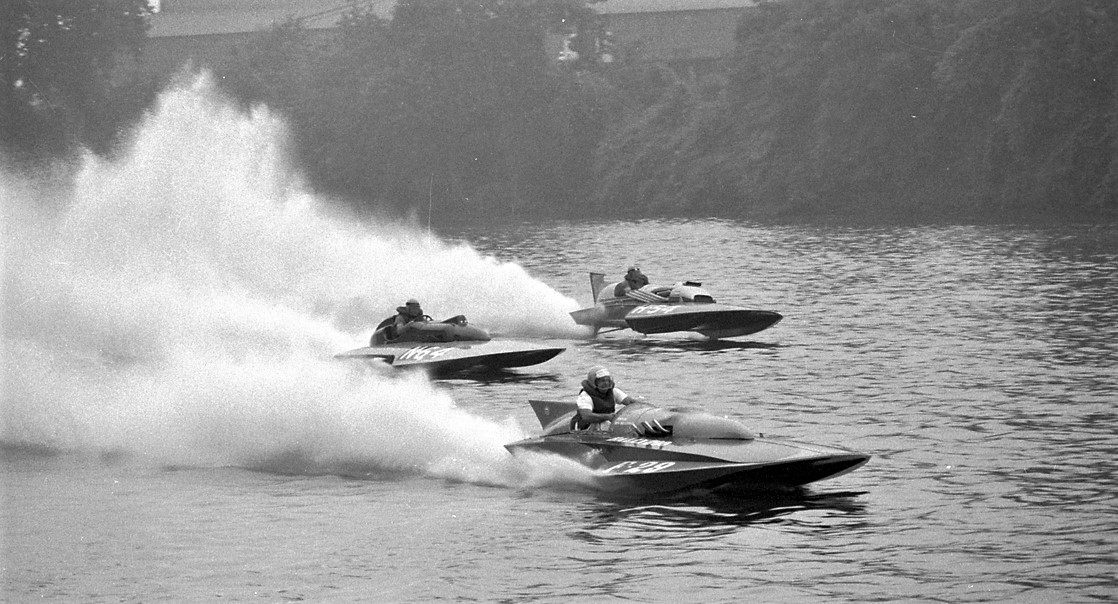
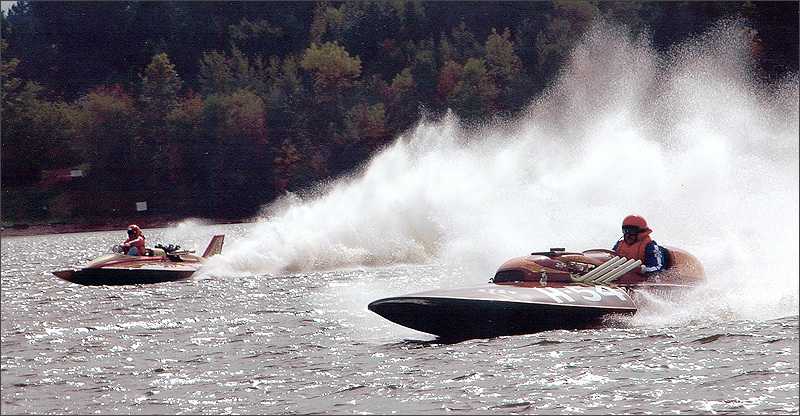
Ford 427 powered H-54 Moonshine Baby & super-charged Hemi 426 powered H-96 Briar Hopper
Phil Kunz told me right after he took this photo, the boats bumped their sponsons pretty hard in this deck-to-deck race.
Crewmember Cliff Wartman told me "Dallas was always one to experiment. Since he owned a body shop, some of the experiments involved using fiberglass for cockpits, etc. We went to Florida for the Orange Bowl Regatta in 1959, with the 280 class Moonshine Baby E-54 having a completely enclosed cockpit. When we stopped in the small towns on the way down, the locals thought it was a rocket ship. The hull did not carry that cowling very long as Dallas said it was a rough ride and the sound was like riding inside a bass drum."
 New Martinsville, W.Va. 1966 New Martinsville, W.Va. 1966
Speed Trials (straight-away record run attempt)
Photo by Phil Kunz
Dallas Kremer told me he liked the weekend races that had kilo runs on Saturday and the race on Sunday.
His mechanic, Red Barrington was very good at tuning and synchronizing the 6 Stromberg carburetors for the Ford 427.
For the straight-away record runs, Kremer stated he would "burn alcohol, with a little Nitro mixed in, for that extra kick and push the motor north of 6,000 rpm."
Dallas told me his best run was 138 MPH at New Martinsville, West Virginia in a 1 mile speed trap.
The third owner, Steve Mahac told me he was running this hull well into the 140 mark during the early 1970s.
1967 Newport, Kentucky
Photo by Phil Kunz
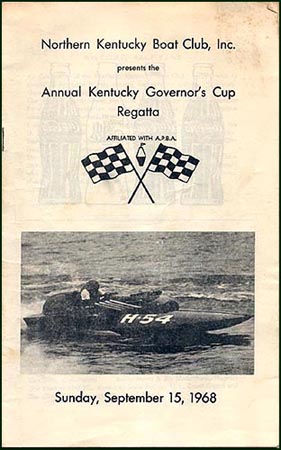
Moonshine Baby on the cover of the 1968 Kentucky Governor's Cup Regatta
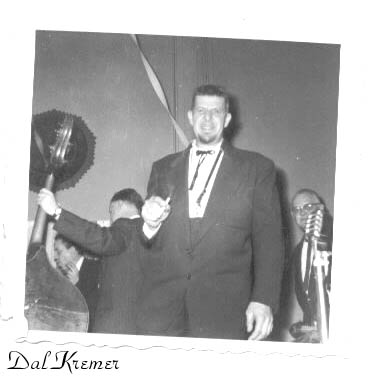
Dal & Hazel Kremer
1978
Dallas R. Kremer served during WWII in the 571st Bomb Squadron with his main duties
being an Airplane and Engine Mechanic on the B-17 Bombers. He also flew on missions over Europe as the Waist gunner.
Rebel Rouser years
Zanesville, Ohio 1969
Photo by Phil Kunz
Dallas Kremer sold the hydro to George "Ray" Reynolds of Detroit, Michigan and he campaigned under the Moonshine Baby name for a season.
The next year, the hydro was campaigning as Ray's Rebel Rouser.
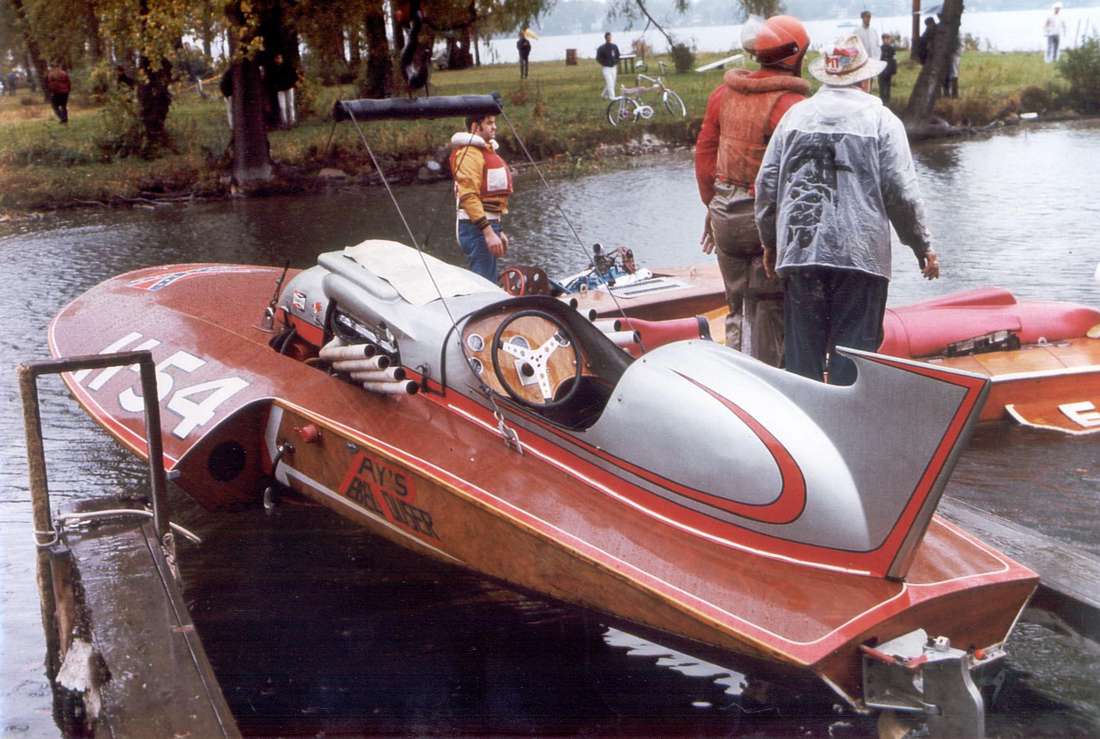
Pontiac Lake, Michigan 1969
Photo by Phil Kunz
Ray raced the hydro for a few years, then sold it to a fellow Marine Prop Riders club member Steve Mahac of Harsen's Island, Michigan after the 1971 season.
Ford Lake - Ypsilanti, Michigan
Early 1970s
Photo by Ted Lee
Ypsilanti, Michigan 1974
Photo by Phil Kunz
Steve continued to race the hydro under the name Rebel Rouser.
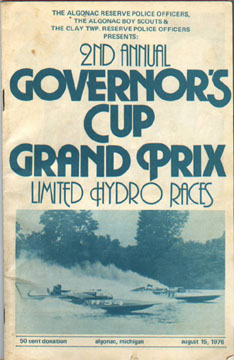
This is the Rebel Rouser H-54 with owner/driver Steve Mahac going up against Mario Malardo
in Baby Doll II on the program cover for this race in Michigan.
circa: August 15, 1976.
After Steve Mahac's last race in the fall of 1976, he advertised it in the APBA Propeller magazine and sold the hydroplane.
Steve was the last person to drive her in competition.
|
In 1976, Richie Dittrich, a hydro driver from Minneapolis, Minnesota, bought the hydro from Steve Mahac.
His plan was to restore the aging hydroplane and keep racing her. He never got around to the task and eventually received an offer in 1984 from somebody to buy the two Ford 427 motors. A week later, he sold the racing hull and all the parts to somebody else. I do not have any history of H-54 from 1984-1988.
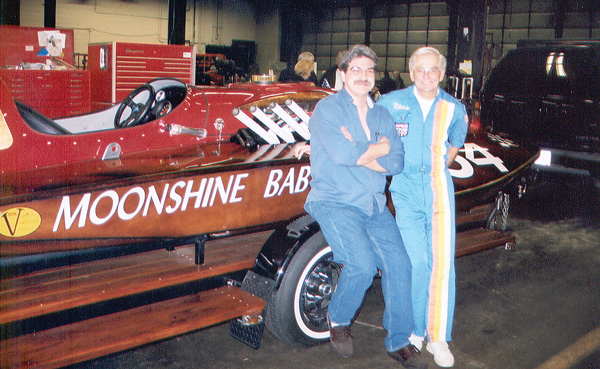
Current owner-restorer-driver Phil Spruit (left) and past owner Richie Dittrich.
|
1988 – Lisa & Tad Colwell saw the hydroplane sitting outside in a boat junk yard by Lake Minnetonka, MN (Mahogany Bay) and purchased it. I talked with the owner of Mahogany Bay years later and he doesn’t recall who how he ended up with the H-54.
I saw her for the first time shortly after that when Tad brought up the H-54 to the shop to remove the Chevy small block (which was seized-up) from the boat. The entire inside of the hull was soaked with oil. The hull had its plywood skins delaminating and there were two holes in the bottom of the hull. |
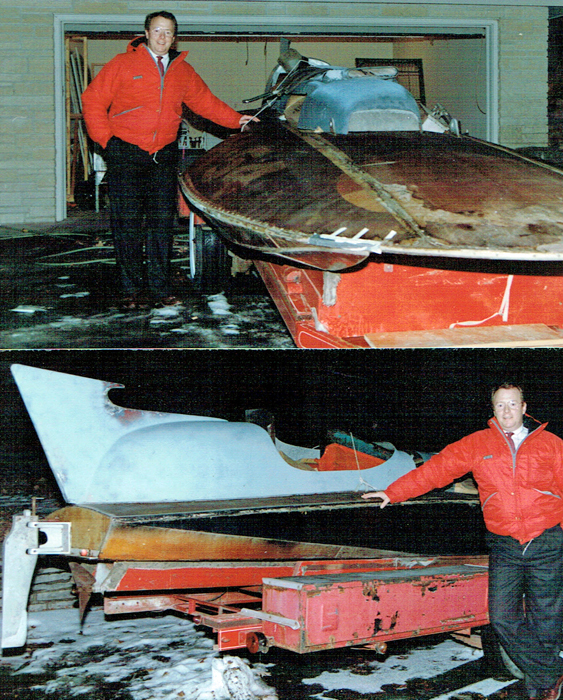
Tad Colwell - 1988
Tad never got around to working on it, then they moved...so the the boat was destined to sit in a St. Cloud, MN storage building until 1996 when I 'bought' the hydro from Tad. I wrote a short story about that and what I was going to do with it: The Rescue of This Old Hydroplane |
|
Thanks
- I was lucky enough to talk to Dallas Kremer twice before he passed away in 1997. He sent me photos and newspaper clippings from this hull's racing days. His wife, Hazel, passed away in 2012.
- I never met the second owner, George "Ray" Reynolds who passed away in 1998.
- The third owner, Steve Mahac lives in St. Clair, Michigan. I appreciate his help he had given me during my restoration of the hydro.
- The fourth owner, Richie Dittrich, lives in Minneapolis, Minnesota. I located Richie in 2002 and he visited H-54 and I shortly afterward.
- Thanks to Cliff Wartman, crewmember with the Moonshine Baby team from 1955-1964, for help with photos and information.
- Thanks to Jim Moore, original builder of Moonshine Baby. Jim passed away at age 79 in November 2006.
- Thanks to Tom D'Eath for identifying this hydroplane for me in the first place, photos, information, contact names and answering all my many questions as I was rebuilding this hull.
- Thanks to Phil Kunz for allowing me to use his photos of Moonshine Baby / Rebel Rouser.
I am always looking for photos, home movies or even just stories on this hydro. Please send an email or call (763) 221-8285
© Phil Spruit
|
|
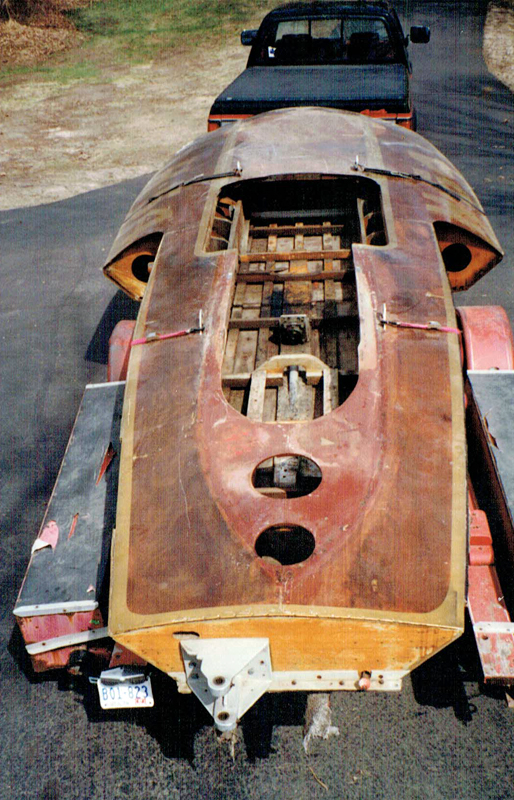
The Junior Gold Cup, 7 Litre (H) class inboard hydroplane is a 1960 Ted Jones design that competed from 1961-76.
The hydro was built originally by Jim Moore & Dallas Kremer of Bellevue, Kentucky.
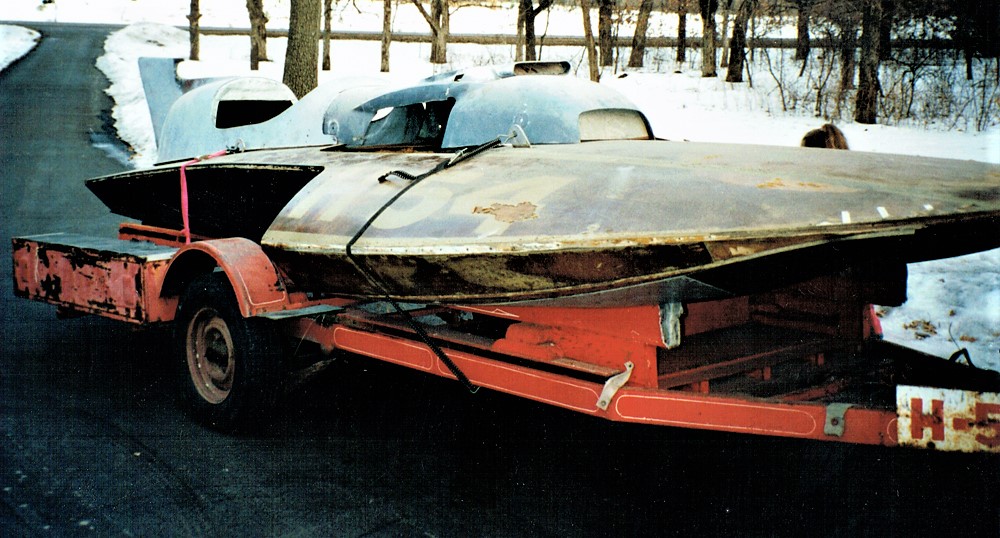
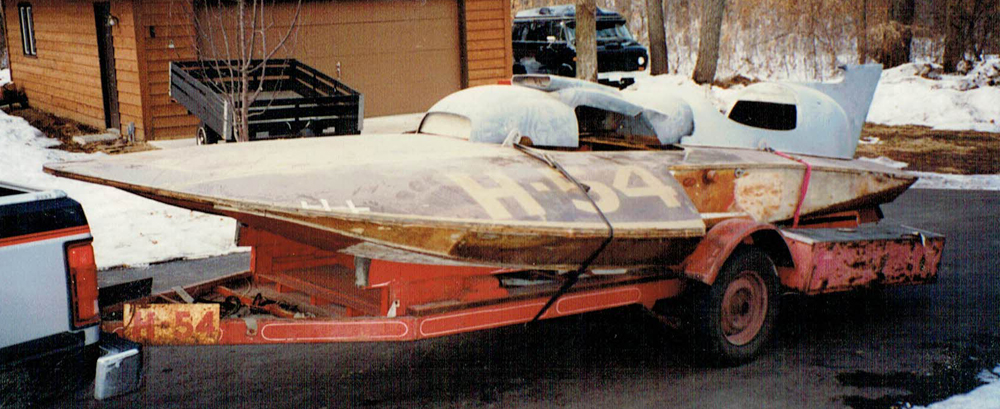
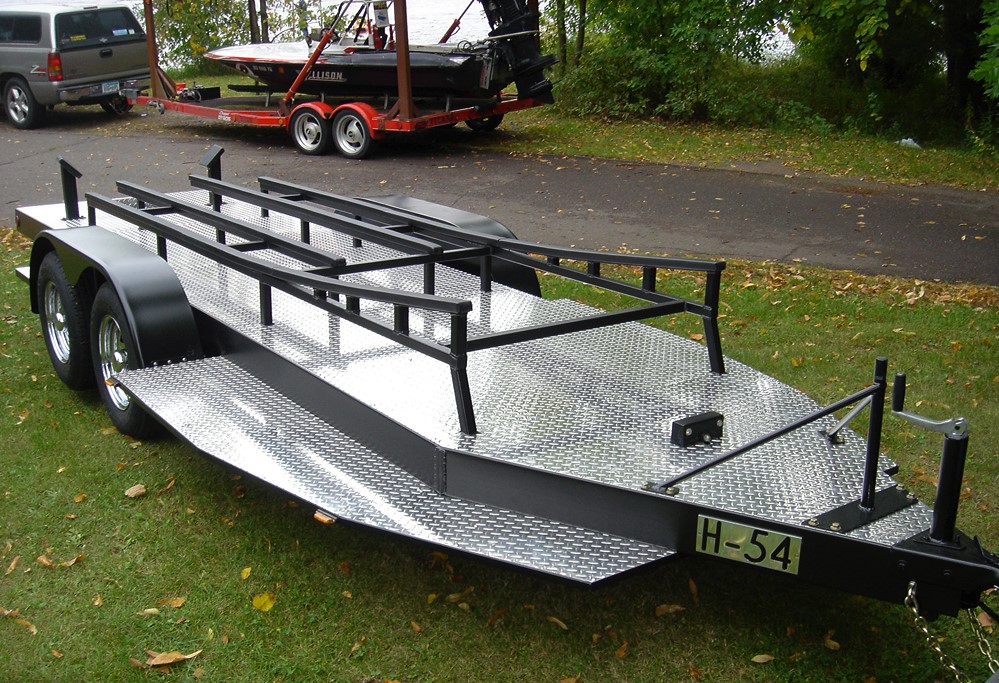
These photos depict the day I brought H-54 home from a storage facility in St. Cloud, MN in March of 1996. It had been in storage for about 8 years. The trailer appeared somewhat road worthy and my hope was that it could make the 1 hour trip to my home. I checked the trailer bearings and then took the tires to a truck repair outfit down the road. $20 later I had a couple of used tires mounted on the rims and went back to the storage building. The 2x6 wood framing for which the hydroplane was supported on was dry rotted through completely in spots. I was jumping on the inside of the hydro to determine if the wood framing could potentially bust apart on the trip home. Luckily, they did not.
I loaded up everything and brought H-54 to her new home.
 The boat was given to me by Tad & Lisa Colwell and they purchased it in 1988. At that time Tad had removed a incorrect class-sized, seized-up, Chevy small block motor that somebody had fitted into the hull. All the hardware had been removed from the hull and were put in boxes. The parts that came with the hull included the motor mounts, rudder & quadrant, propeller & propeller shaft, strut, skid fin, steering gearbox & linkages, Hallcraft gearbox & the gearbox mount, seat, battery tray, gas tank, and various aluminum parts. The boat was given to me by Tad & Lisa Colwell and they purchased it in 1988. At that time Tad had removed a incorrect class-sized, seized-up, Chevy small block motor that somebody had fitted into the hull. All the hardware had been removed from the hull and were put in boxes. The parts that came with the hull included the motor mounts, rudder & quadrant, propeller & propeller shaft, strut, skid fin, steering gearbox & linkages, Hallcraft gearbox & the gearbox mount, seat, battery tray, gas tank, and various aluminum parts.

If only it had the original 2 - 427 Ford race motors, 6 Stromberg carbs, zoomie pipes and all the other motor goodies that Richie Dittrich had with it. He told me he sold the motors to someone first, then the boat a week later to somebody else in the Minneapolis area around 1984.
 |
Spring broke and I was ready to tackle this project.
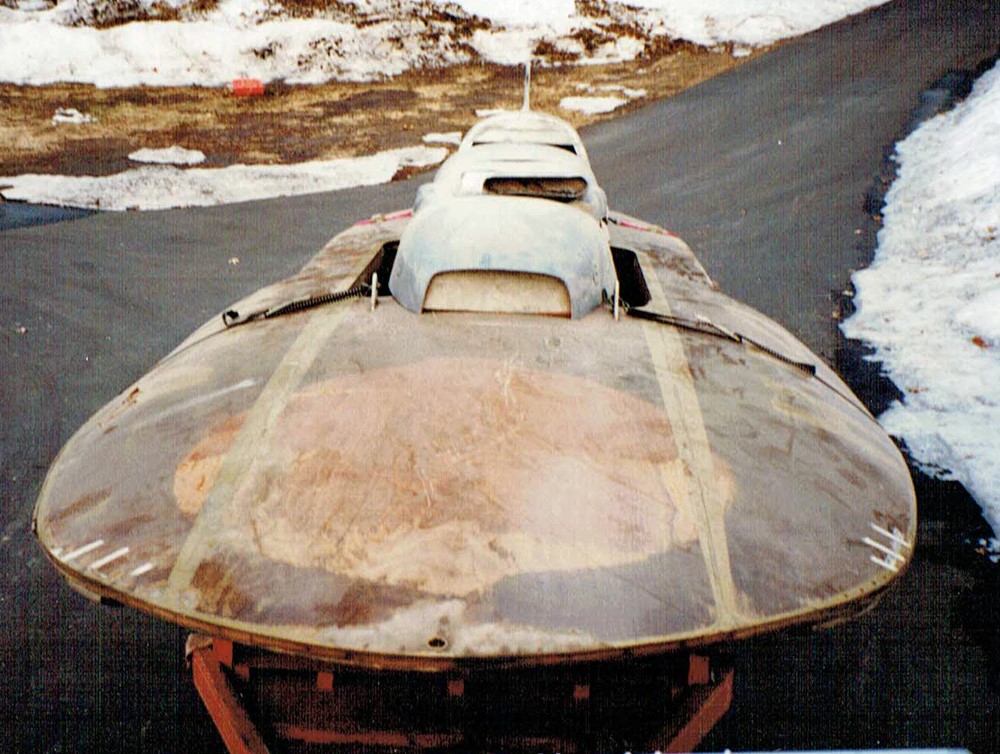
The first thing I did was to gently "shove" the hydroplane off the trailer to make it easier to remove the deck plywood. Now I had a interior view of the entire inside of the hull and sponsons. After surveying the frames, battens, beams, etc. it became apparent that just cleaning up the inside and repairing a few broken boards would be not be my idea of a restoration. Oil from a blown motor coated almost everything in the engine bay and had penetrated under the varnish and wicked into the wood framing and severely softened the lumber. The only way I could do the quality of restoration I was intent on doing would be to start with new lumber for the framing. The original hull therefore would become a pattern for it's own rebuild.
I was able to rescue some of the original lumber to be used into the new hull (mostly for sentimental reasons). |
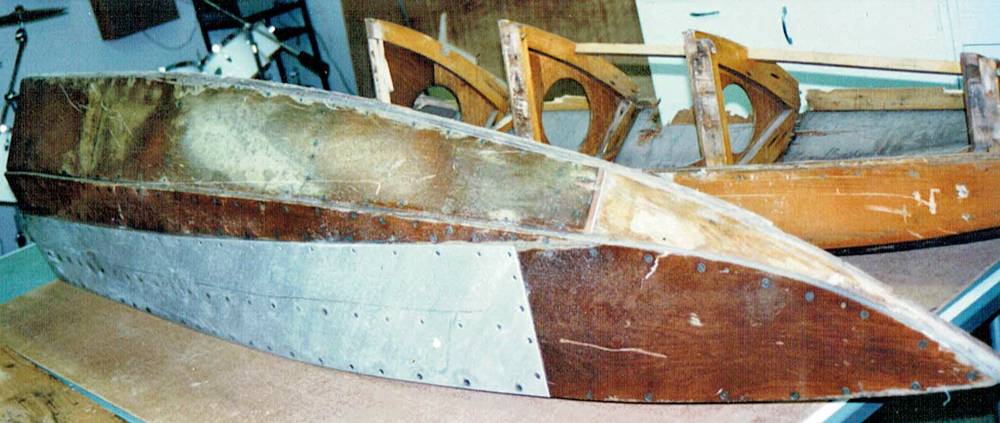
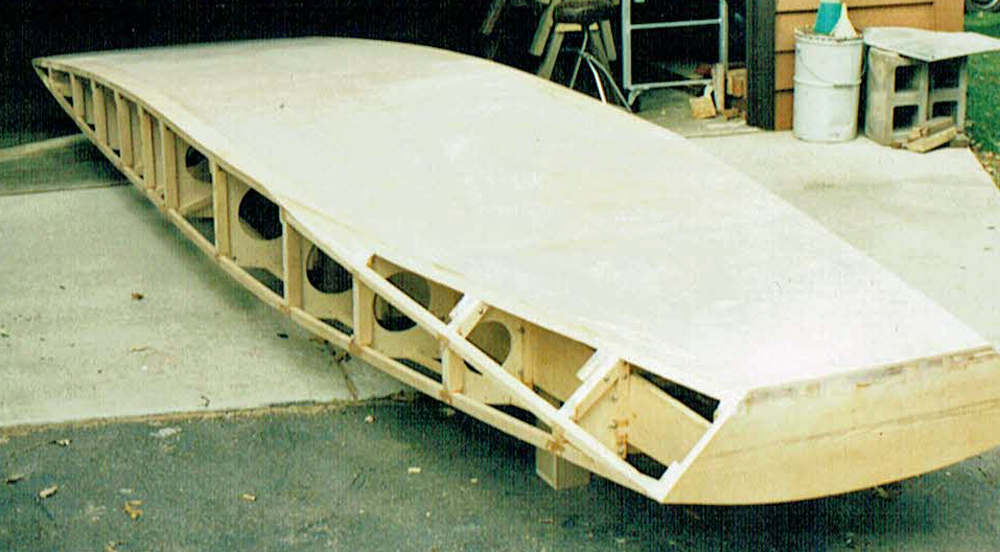
The sponsons after unbolting and busting them loose from the hull. Note the aluminum plates that were attached to the runner surface of the sponsons. There were multiple layers of plywood which made up the different levels of the runners and sponsons chines. The sponsons that were incorporated into the design of this hydroplane are the wet type sponsons. They are designed to fill up with water when the hydro is placed in the water, and then the water would flow out of the sponsons after the hydro reaches planing speed. Surprising there was little signs of dry rot.
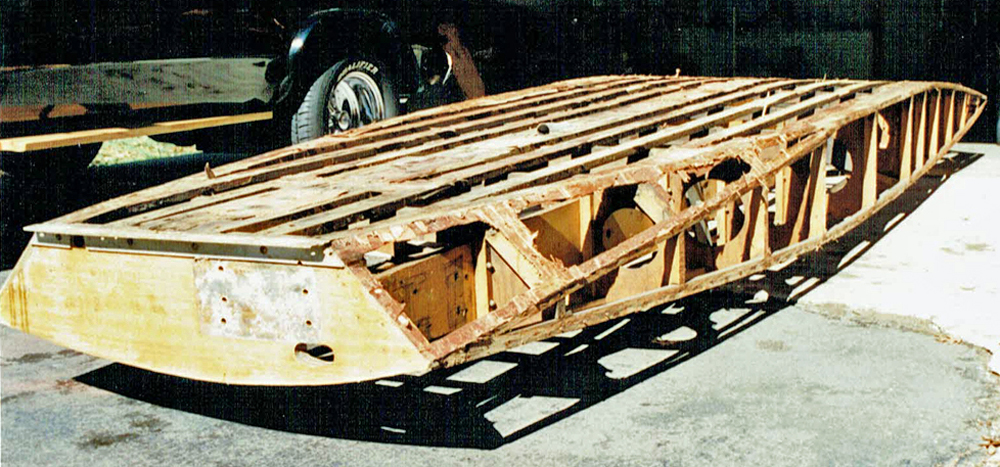
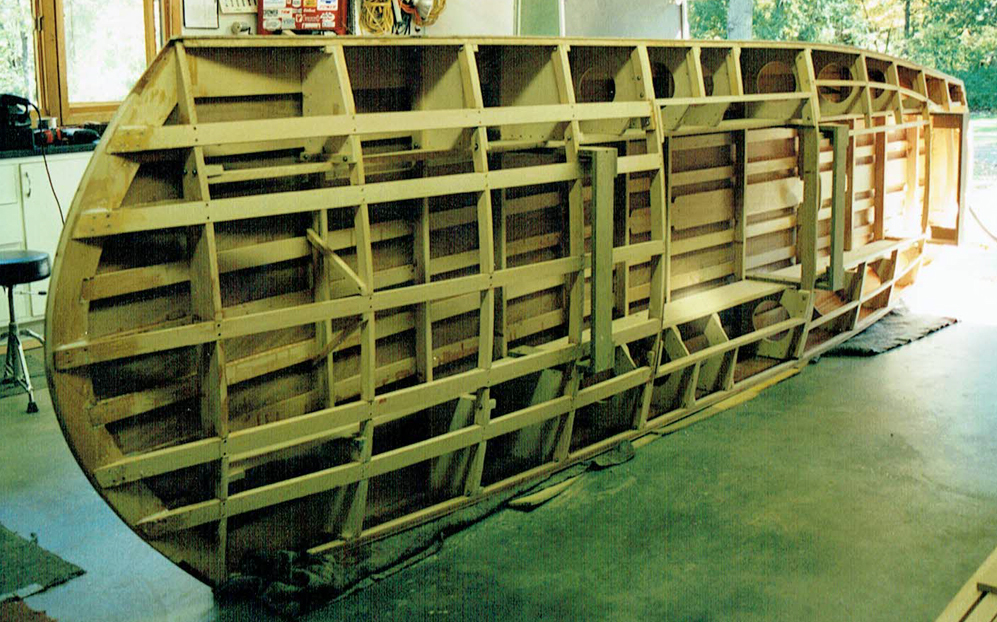
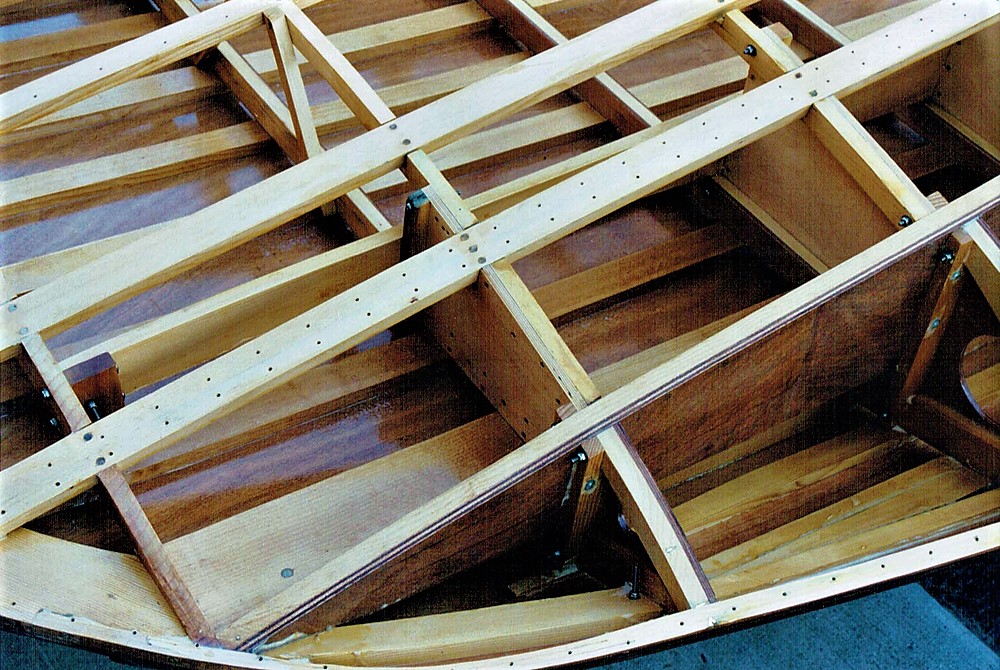
With the sponsons off the hull, all remaining plywood is removed from the framing. This reveals the skeleton of the hull.
I first unscrewed all the battens and deck beams. After they were out of the way I unbolted each of the 12 frames that slide up along the 2 main motor stringers. I started with the transom and removed and marked each frame. When they are all removed you end up with a pile of lumber.
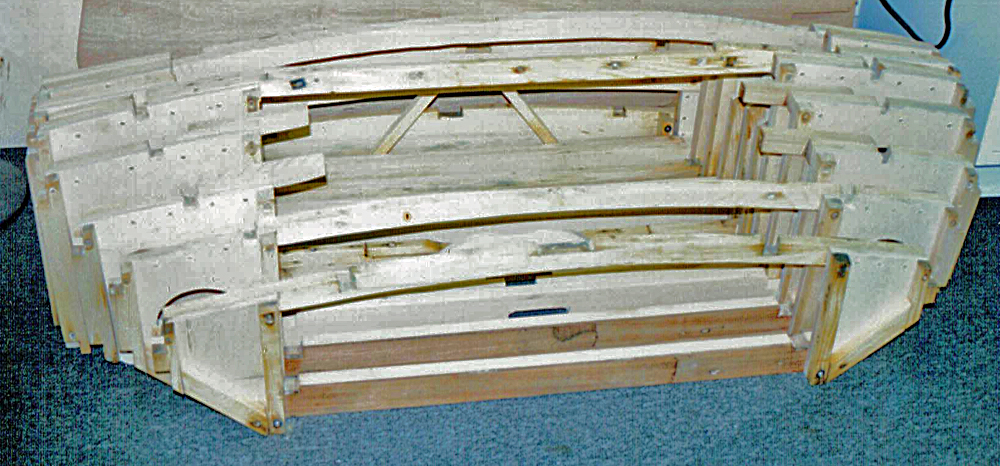
After I disassembled the old frames I was able to use them as patterns for making the new frames. The new frames were made using 7-ply, 1/2" thick Birch plywood that was bolted and screwed to 13/16" thick Sitka Spruce lumber. This will replace the original 3-ply, 1/4" thick Douglas Fir plywood. This will increase strength and not add much weight.
I purchased 2 Sitka Spruce boards 19' long x 10" wide for the motor stringers. The original ones were 2 smaller pieces scarfed together to get the required 19' length. After jig sawing and fairing the motor stringers to shape the 12 frames and transom are bolted to the 2 motor stringers. The battens are epoxied and screwed to the frames and then the bottom plywood is attached to the battens. The new plywood bottom is made up of 7-ply, 3/8" thick Okoume plywood. The original hydro was 'skinned' in 3-ply, 1/4" Mahogany plywood. I scarfed 3 pieces of plywood together to get the 19' length needed for the bottom and sides. Six inch wide pieces were added along both sides of the 48" wide bottom to cover the width needed. The plywood "skin" is epoxied and fastened to battens with silicon bronze wood screws. Mahogany wood plugs (versus fiberglass filler that was originally used) goes into all the screw holes and sanded flush.
 The sides and non trips plywood pieces are being epoxied and screwed to the hull's frames. I scarfed 3 pieces of 3/8" thick plywood together to get the 19' long sides. Wood plugs are glued in and flush sanded. While applying the epoxy coating on the outside I embedded fiberglass cloth into the epoxy coating. This will give the sides of the hull better abrasion resistance and a little more strength. After completion of the other side the hull is ready to have the sponsons attached. The sides and non trips plywood pieces are being epoxied and screwed to the hull's frames. I scarfed 3 pieces of 3/8" thick plywood together to get the 19' long sides. Wood plugs are glued in and flush sanded. While applying the epoxy coating on the outside I embedded fiberglass cloth into the epoxy coating. This will give the sides of the hull better abrasion resistance and a little more strength. After completion of the other side the hull is ready to have the sponsons attached.

I uprighted the hull to epoxy and bolt the sponson frames to the hull. I temporally attached the fore deck skins to give me a shape to follow for fairing in on the sponsons. With that completed I flipped the hull back upside down (photo above) and screwed down the battens. This photo was taken just before I started fairing all the boards in preparation of laying down two layers of plywood for the sponsons bottoms.
 |
This photo was taken of the bottom after completion.
I dry fitted all the aluminum parts that needed to go on the bottom of the hull. After removal, I finished the bottom. Next was sanding & polishing of all aluminum plates & parts. Attachment is by gluing & screwing.
The strut and 2-blade propeller are steel and those were re-plated. A log shaft was fabricated by Henry Lauterbach. This replaces the old stuffing box and mid strut. The skid fin, 2 sponson runner plates & shaft bearing mount are original. I fabricated a new sheet of aluminum for the aft section of the hull. The old one was badly pitted.
I was curious as to why there was so much 'battle armor' attached to the bottom. It was more than any other hydroplane I've seen from that era. Original builder/owner/driver Dallas Kremer told me the boat raced so much on the Ohio River and typically there was lots of junk floating in the water. The plates were put on to the bottom to keep the plywood protected from penetration. |
| I flipped the hull over and placed it on a temporary dolly to finish the restoration. I notched out the frames for battens and epoxy & screwed them to the frames. This is followed by fairing of all the deck beams for final overall shaping of the decking. After I was happy with the final dry fitting, everything was removed. I masked off the sides & bottom from overspray and sprayed about 2 gallons of polyurethane to the interior of the hull & sponsons. |
 |
Areas not seen, I did not spend much time cleaning up the squeezed out epoxy. Since everything was sanded prior to assembly, that made for a good base to apply a few coats of thinned out sealer first, followed up by a few full strength coats. The coatings of polyurethane applied to everything else should seal any exposed areas of wood just fine. One of the nice benefits about working from scratch with new wood.
While fitting the deck plywood, now's the time to get the steering system,
lifting brackets, and strut reinforcement parts installed.
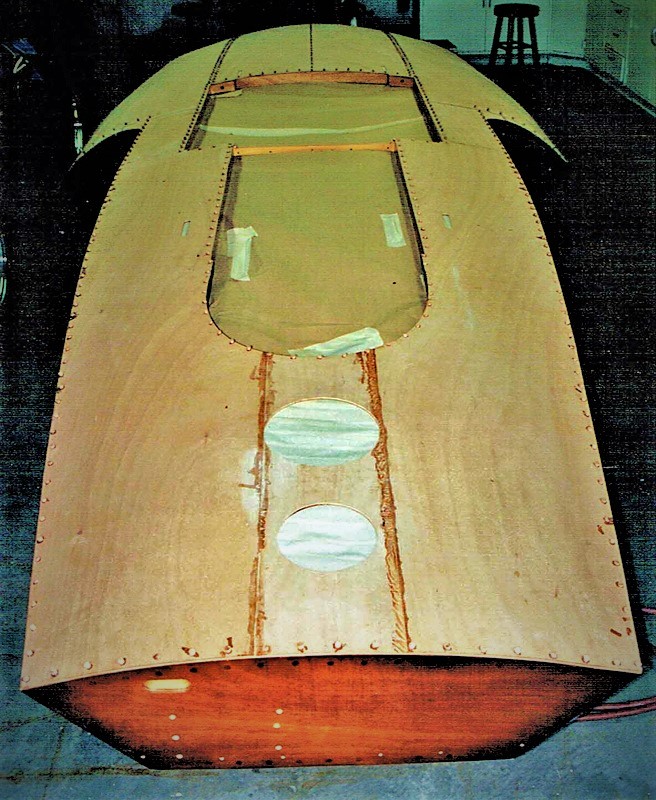 |
The 3/16" thick Okume plywood deck 'skins' are fitted, epoxy & screwed down to the framing. All screw holes are filled with wood plugs and waiting to be cut off & sanded flush.
The sponson decks could not bend to the top shape of the hull so I soaked them with hot water. Within a few minutes the panels were flexible enough take the shape.
The whole top was glued & screwed with 2 sponson deck panels, a center panel and one aft panel. I scarfed plywood to get the panel lengths & widths required.
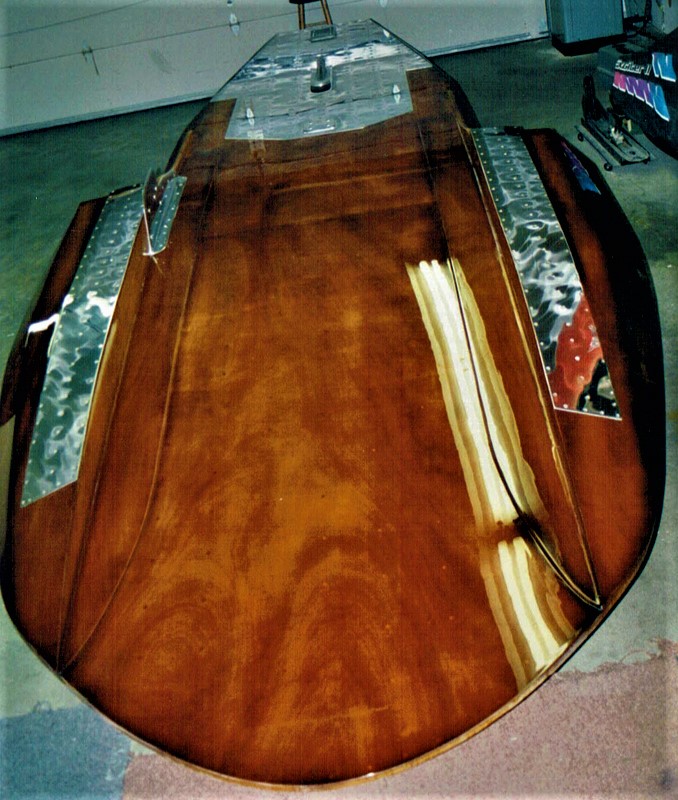
I made a 1/8" wide groove cut with my router & Mahogany inlay was glued in all deck joints to give it a bordered & finished look. |
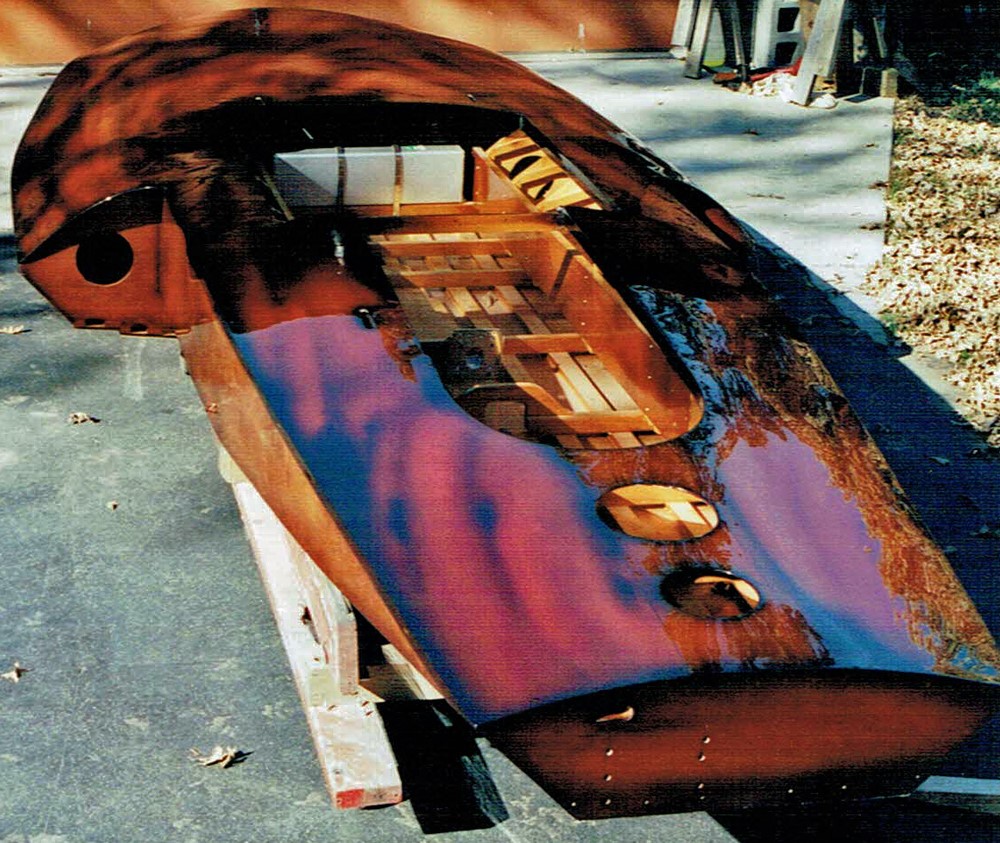
The finish was hand wiped with a penetrating stain, followed by airbrushing different shades of dye stains. It was my attempt to get some depth & warmth into the typically bland Okume rotary-cut face veneer. I shaded the edges & corners. I wanted to have the entire deck appear like one large sheet of plywood. Eight coats of varnish were applied with a foam brush over epoxy. Block sand and then the 9th coat was diluted & sprayed. After a few days, I cut open the varnish coating with sandpaper and let it cure for a month. Wet sanding proceeded to the final 2000 grit size. The buffer was used to bring up the final gloss. If you're interested, here's an article I wrote on the finishing of this hydroplane.
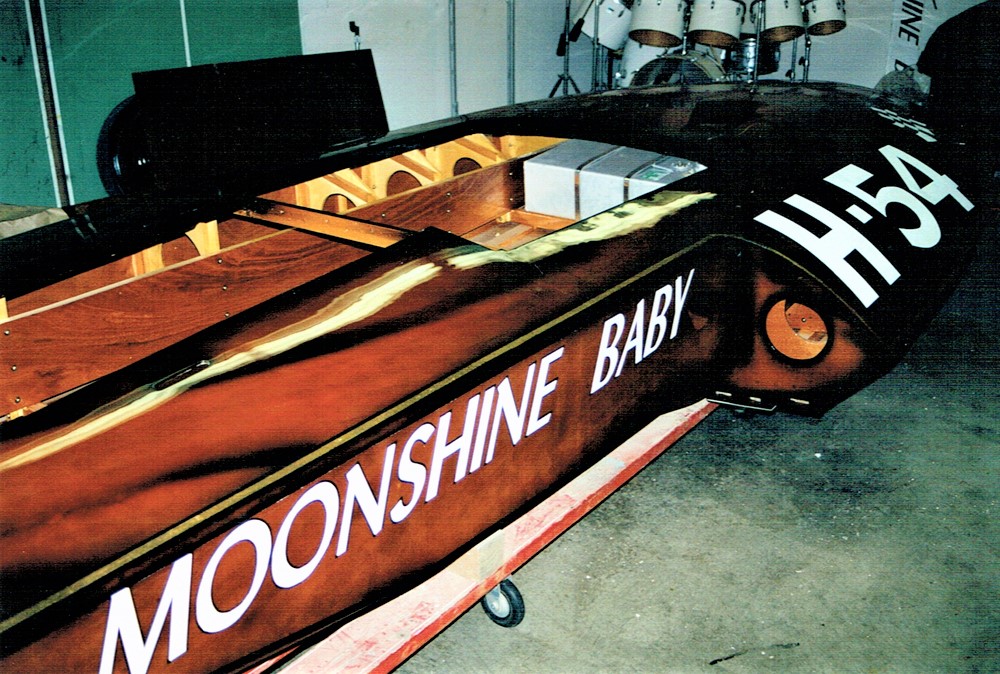
With the woodworking & finishing out of the way, the graphics are next. Preparation began with 2" overlapping masking tape applied. The lettering and flag image are transferred by pressing down on the outline with a pen. Remove the template and cut out (very carefully) using an exacto blade. After sanding to achieve some tooth in the varnish with 320 grit, white and black acrylic enamel was sprayed. The Moonshine Baby template was created by looking over earlier photos in her history and selecting a font similar on my computer. I enlarged each letter and printed each letter out on 8.5 x 11 paper. Then taping the individual pages together to make the template. You can see the template hanging on the wall.
The perimeter of the deck is outlined in gold leaf and trimmed off with black enamel, all applied over a gold metallic base. I applied a stain over the leaf and spattered that with methanol to get the look I was after. This 'look' will also appear on both cowlings.
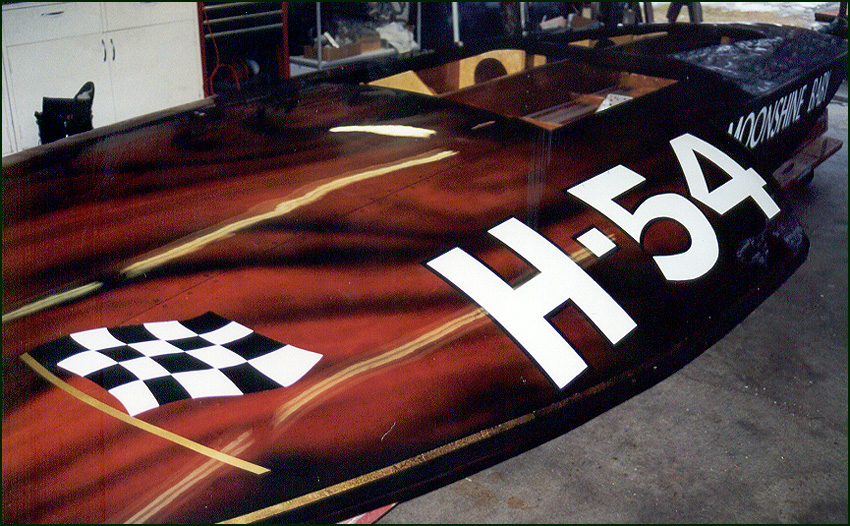 |
After the white enamel was sprayed and had a chance to dry, I outlined all the numbers and lettering with black enamel.
I made the flag template, drawn freehand, looking at old photos from 1961-63.
The template for H-54 was traced from the original numbering off the old deck.
|
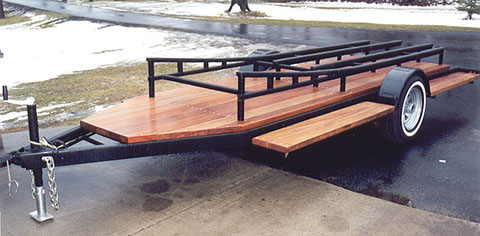 Over the winter I took the original trailer in and had it sandblasted & primer applied. Then moved it to my work to borrow their welder and some steel. I boxed in the frame above the axle and added new crossmembers & bracing. The trailer had a pretty good bend in it and I was not able to get it all out, so I built the uprights from square tubing and welded so the boat at least sits level. I painted everything up with black polyurethane and added a new axle, reworked springs, whitewall tires and chrome rims that have a 1960's look to them. African Mahogany sits on the trailer. Overkill I know, but it sure looks nice. Trailer weighed in at beastly 1220 pounds. Over the winter I took the original trailer in and had it sandblasted & primer applied. Then moved it to my work to borrow their welder and some steel. I boxed in the frame above the axle and added new crossmembers & bracing. The trailer had a pretty good bend in it and I was not able to get it all out, so I built the uprights from square tubing and welded so the boat at least sits level. I painted everything up with black polyurethane and added a new axle, reworked springs, whitewall tires and chrome rims that have a 1960's look to them. African Mahogany sits on the trailer. Overkill I know, but it sure looks nice. Trailer weighed in at beastly 1220 pounds.
(I made a new trailer from scratch. This one became a utility trailer)
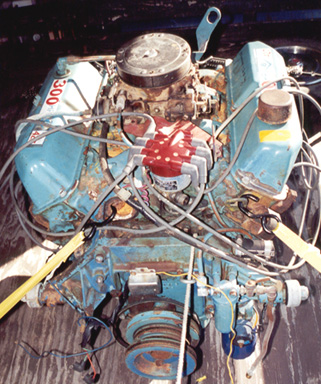 |
Moonshine Baby H-54 campaigned the first 3 years using a stock Ford 390 out of a Daytona race car. The team ran the Ford with an aluminum intake manifold fed by six Stromberg "97" 2-bbl carbs and an aluminum flywheel. When the 427 motors became available from Ford in 1964, crewmember Cliff Wartman & owner Dallas Kremer wrote to Ford asking for help in their hydroplane racing endeavor. Ford responded with free 427 motors to use.
In the fall of 1999, I purchased a 1966 Ford 427 side oiler block and was having it rebuilt. While waiting for that motor to be completed, I located a complete 1967 Ford 427 center oiler motor that originally was one of two that were installed in a 1968 48' Chris Craft. I found the motor to be in excellent stock condition with good compression & low hours. If you can locate one today, most Ford FE 427's have been rebuilt or modified several times by this point in their history. I will eventually put all those 6 carbs back on this motor & aluminum flywheel as time & money permits.
|
|
|
|
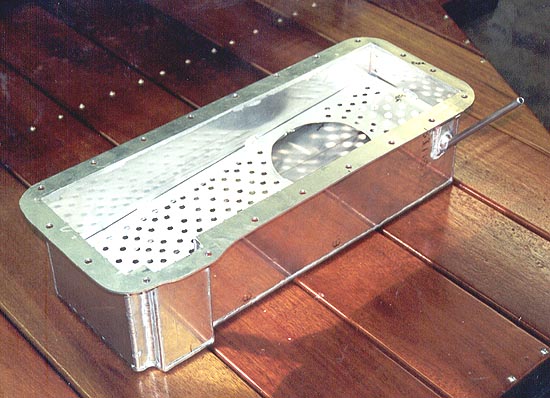
The original cast iron marine oil pan was 2" too tall & very heavy but a plus was that this Ford already had the oil pickup set up as a rear sump in the oil pan. I fabricated a new aluminum oil pan and windage tray from 1/8" thick, T-6061 aluminum. All plates went to the welder for heli-arcing. A 1/4" tube was added into the side of the oil pan which serves as a dipstick & oil drain.
|
 |
Fitting the motor down into the hull and setting up the motor mounts. Space is a premium right now so after the motor is installed in the hull it will be time to put the hydro on the road trailer. I can almost pick the hull up by lifting the motor after it is bolted in and set it on the road trailer. But I'm near the end of my capacity for my motor hoist and don't want to risk it. I'll need to enlist the help from my farmer neighbor and his tractor. |
|
 |
Hydroplane being transferred from the dolly to the trailer with help from my neighbor and his tractor. The long awaited move to the road trailer was pretty uneventful. We lifted the hydroplane up and slid out the dolly and then slid the road trailer underneath and lowered the hydroplane back down. |
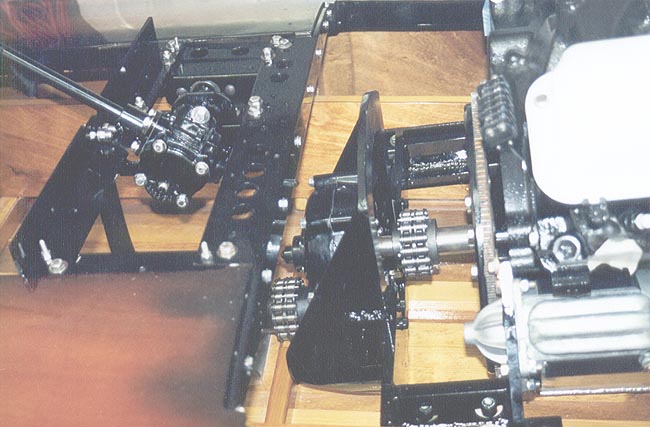 |
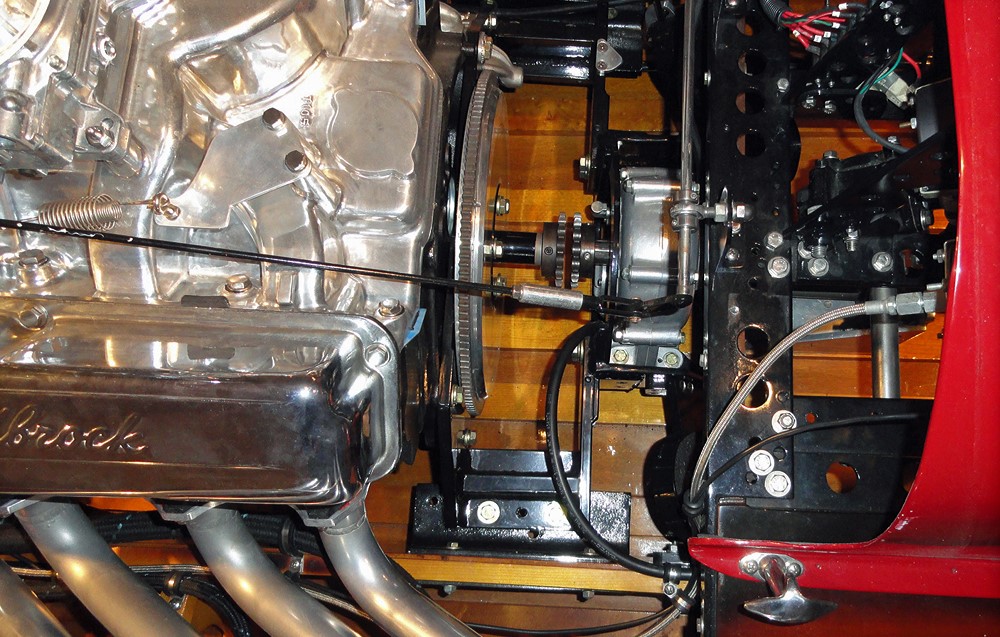
The Hallcraft gearbox (10% overdrive) is bolted to a 1/2" thick, cast aluminum brace that came with the hydroplane. I fabricated & welded the entire gearbox assembly to the rear motor mount plate. When installing or removing the motor, the gearbox unit goes too. I can also remove the gearbox easily in the boat by uncoupling the chains and removing 2 water hoses & 4 bolts. Alignment pins insure the gearbox is kept centered. The front/rear motor mounts & gearbox mounts I made from 1/2" thick T-6061 aluminum. These mounts rest on the four cast aluminum motor mounts that came with the hull & bolt through each engine stringer. I had a machine shop turn out the takeoff shaft on a lathe using 4140 steel (hardened) which bolts to the flywheel. Gear spockets (forged, 16 tooth #50 chain) connects the takeoff shaft and the 1-1/8" diameter monel propeller shaft. The whole works is @ 6-1/2 degrees of angle. I reconditioned the original steering column & gearbox with new bearings. The 2 steering linkage rods were sandblasted, sanded and chrome plated. |
|
|
 |
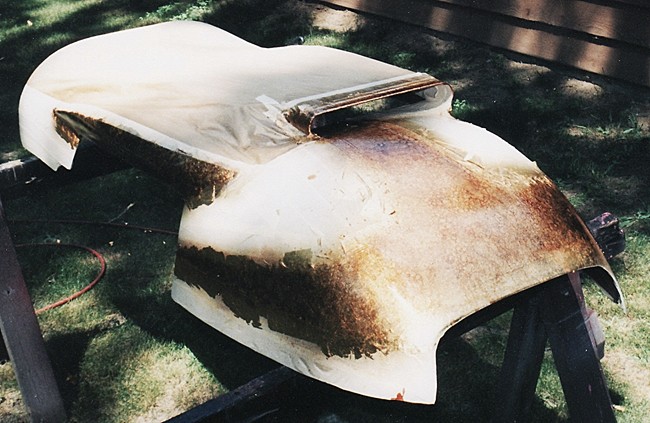
With the hydroplane resting on it's road trailer, its time to start work on restoration of the cowlings.
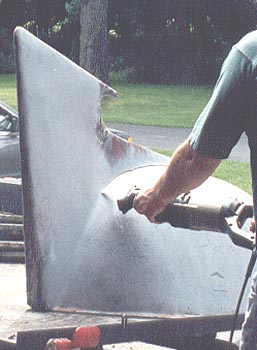
In keeping with the theme of how this boat looked in the early 1960's, the first thing I wanted to do was cut off the tail fin that was installed in the late 1960's. |
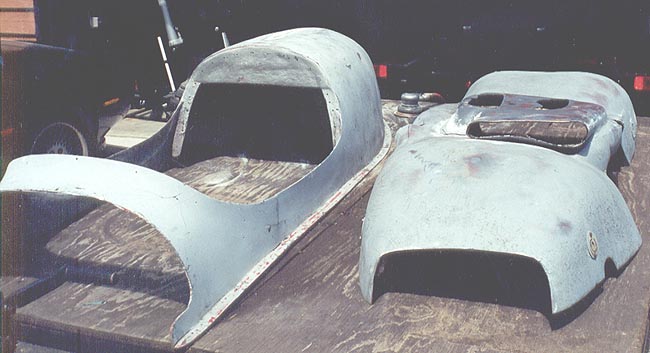 |
These were the 3rd (and final) set of cowlings that were custom fabricated by the original builder Dallas Kremer. The engine cowling was in terrible shape. I started on that one by cutting it into 3 pieces. First, cutting off the hood scoop, then cutting it into half. After building a new hood scoop and reshaping & fitting the area that goes above the motor's valve covers, I refiberglassed the engine cowling back together. The drivers cowling was broke in a few spots but essentially in sound shape. |
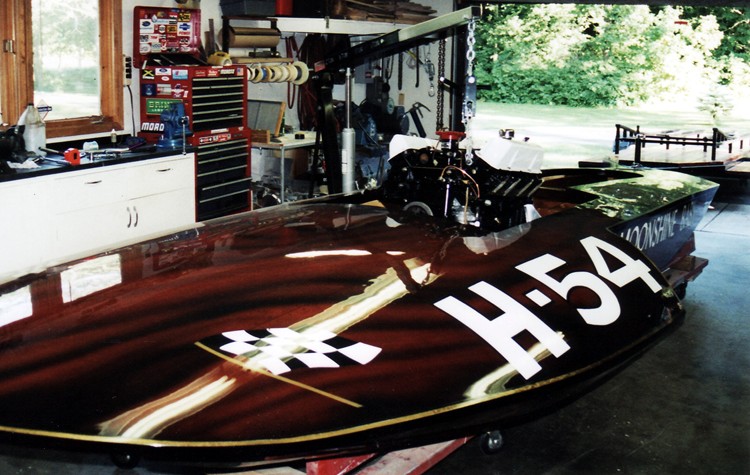
I just finished painting the cowlings with Candy Apple Red enamel.
I am using the paint scheme for the hydroplane cowlings that were originally on it in 1966,
which are the same set of cowlings that are currently on her now.
The graphics on the hull are from its first years.
 |
The cowlings after gold leaf was applied. The cowlings were done the same way the border around the perimeter of the deck was done. I sprayed an acrylic enamel with gold metal flake powder added. |
 |
After the leaf set up, a couple of clear coats over it. After the base was cured, I spattered orange, yellow, and brown dye stain over the leaf to tie it in with the gold striping I used around the perimeter of the deck. After a few more clear coats, the mask was removed and a black pinstripe was applied to frame the leafed areas. |
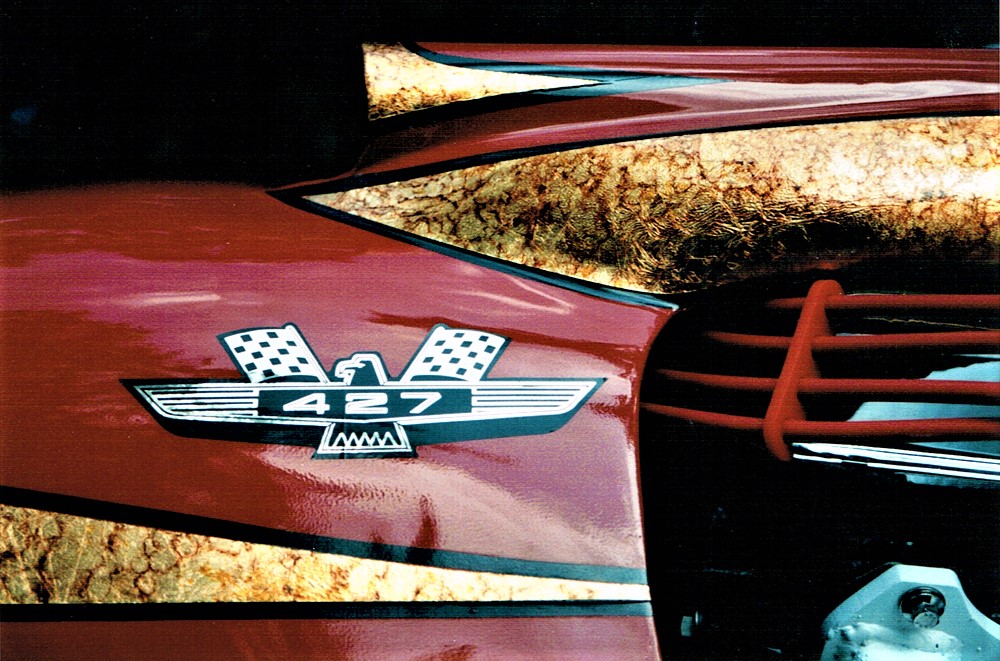
The Ford 427 "baldie" emblem from days gone by - again grace the cowling of this 7 Liter class Junior Gold Cup hydroplane
|
|
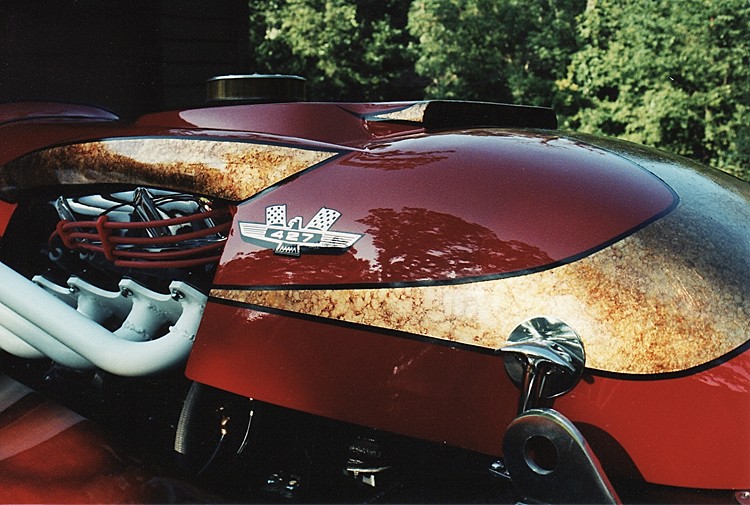
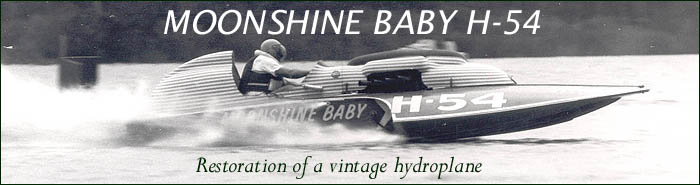
Moonshine Baby H-54
Even though these racing hydroplanes were built for speed I have noticed that appearance is an important aspect for many of the owners & builders of these fast machines. Countless hours and bundles of money could be poured into the racing hulls. Pride of ownership was reflected in these water skipping machines. Wood racing hulls were....and still are.......great works of art and beauty.
|
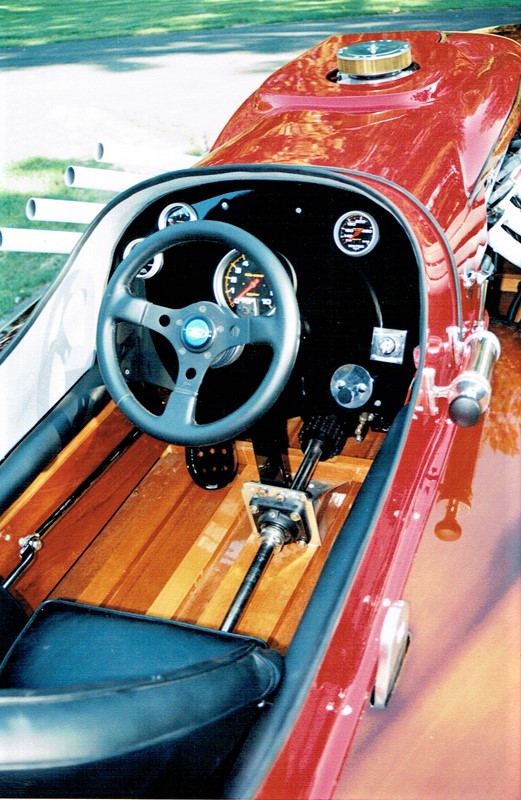 |
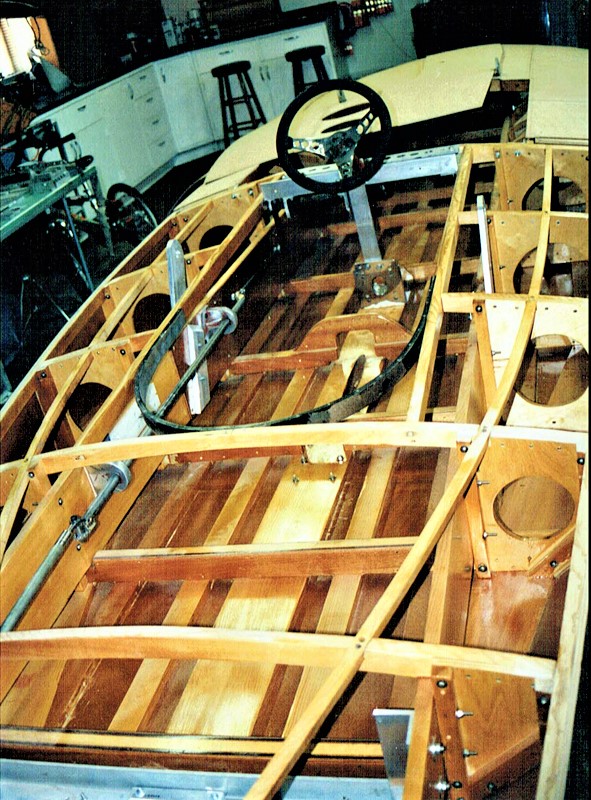
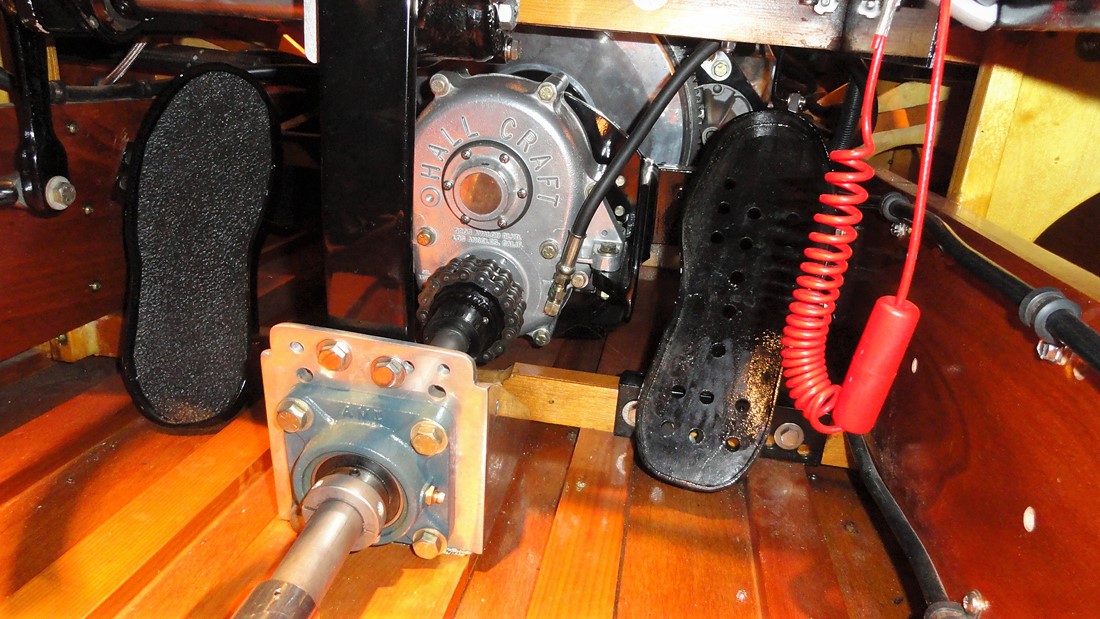
Having just a one photo to go by that showed just a small portion of the dashboard, I attempted to piece together the drivers compartment. All the original parts that came with the hull have been reconditioned and reinstalled into the hull. These were the gearbox, prop shaft, prop shaft bearing and aluminum mount. The steering system was complete when I first got the boat and included the gearbox, column, mounts, and steering linkages (which I had chrome plated). Other parts were the accelerator pedal and the gas tank hand pump mounted on the rear cowling as well as the lifting rings. The drivers seat is also original, but I rebuilt and reupholstered it. The seat cushion was still in excellent condition after 40 years and is still sitting comfortable after all these years.
The dashboard is fabricated which a piece of 3/8" Okume plywood I had left over from building the hull.
After I fitted and cut the instrument holes in the dashboard, I removed and sprayed black acrylic polyurethane.
The instruments are Auto Meter, and are (from left to right) Oil Pressure (0-200 lbs/liquid filled/mechanical), Fuel, Tach, Water Temperature (120-240 degrees F./liquid filled/mechanical), ignition switch and kill switch.
|
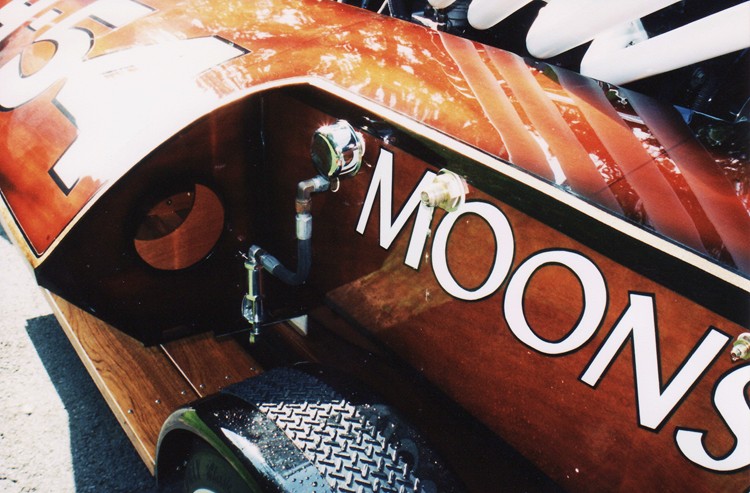
| I used the original sponson-mounted water pickups. Just above the actual water pickups is a one-way valve that will prevent the water from falling back out of the system. These 2 water pickups feed into a aluminum distribution manifold and then feed each cylinder head and the gearbox. The water exits out the motor through the thermostat housing and then outside the hull (see outlet above the M and the O). The water from gearbox has a separate outlet (see outlet between the N and the S). The valve cover air breather is mounted outside the hull (just before the M). I used all hydraulic hoses and JIC fittings for all the water lines. |
 |
|
MOONSHINE BABY H-54
|
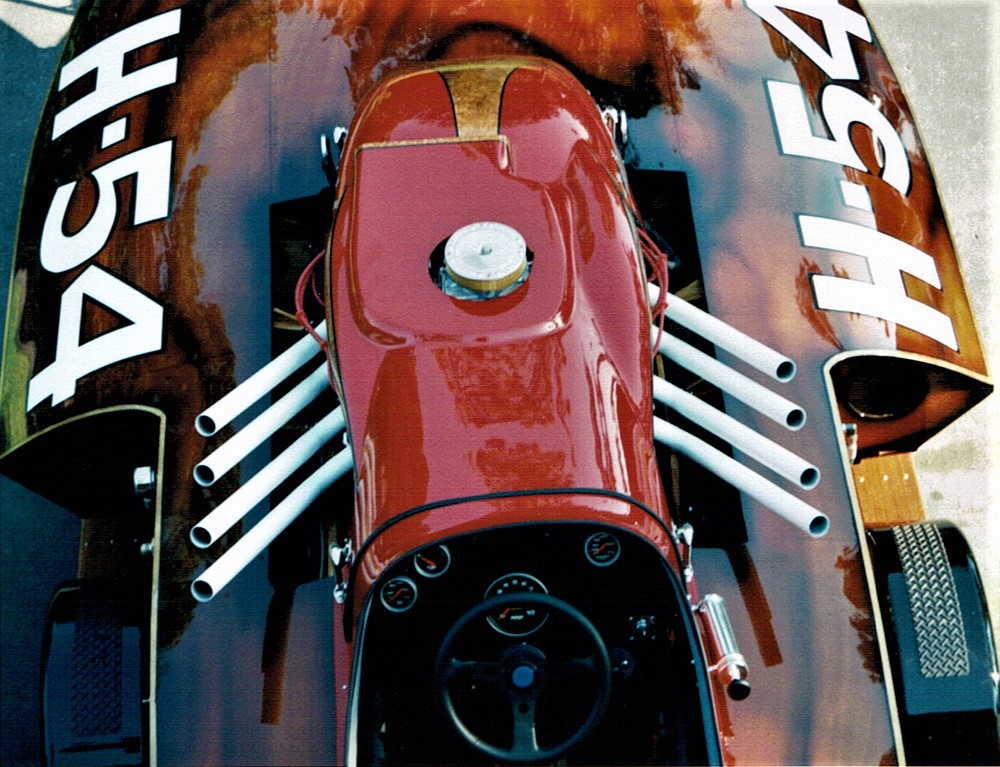
| The zoomies are quite loud and even though this setup for the headers may actually rob a few horsepower, they have the unique "dragster" sound versus all the pipes coming together into a collector. I had the header flanges custom made from 3/8" thick mild steel and ported to size to match the stock cylinder heads rectangular ports. I bought eight 1-3/4" diameter j-pipes and cut, fitted, & welded the individual pipes to the header flanges |
|
 |
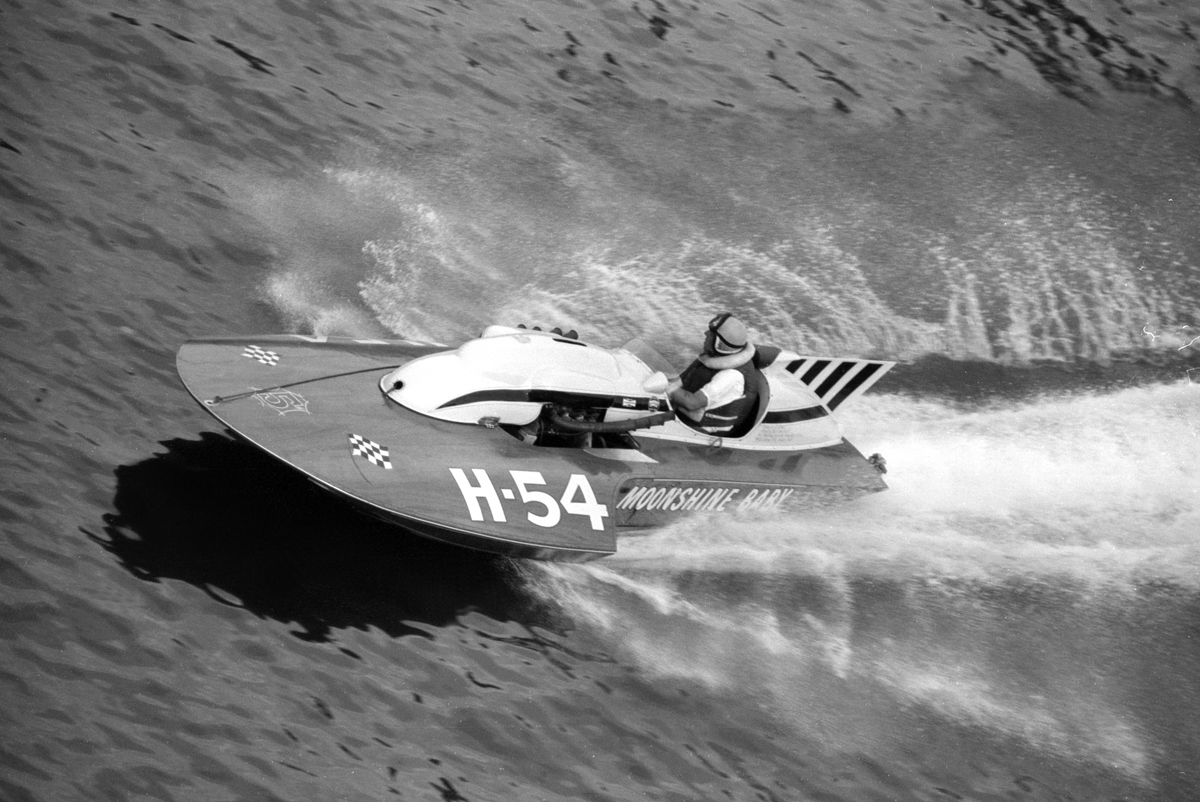
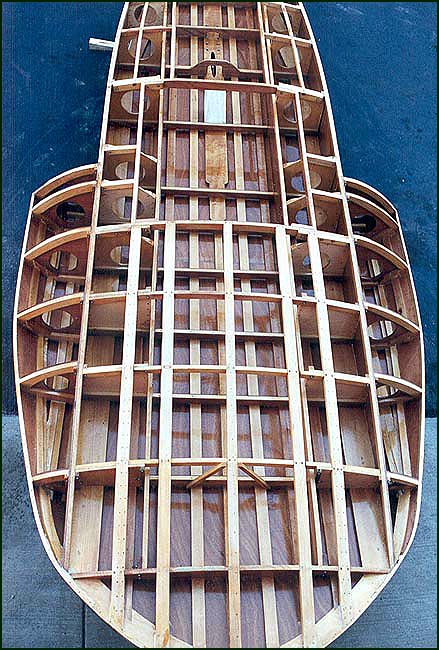
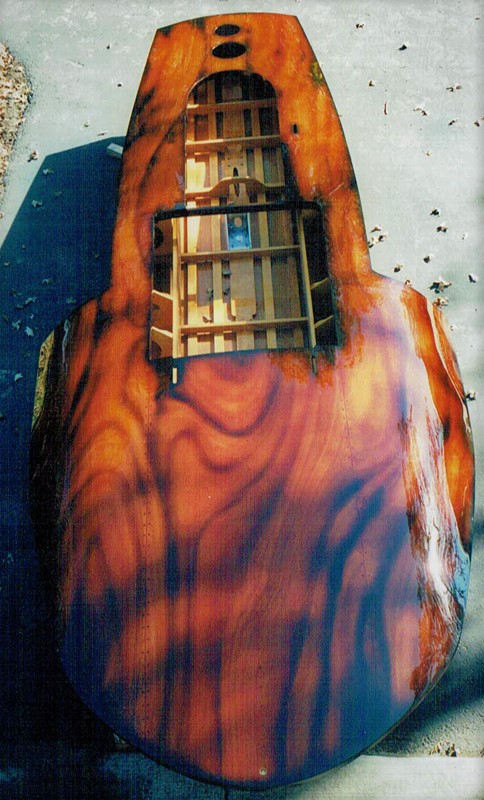
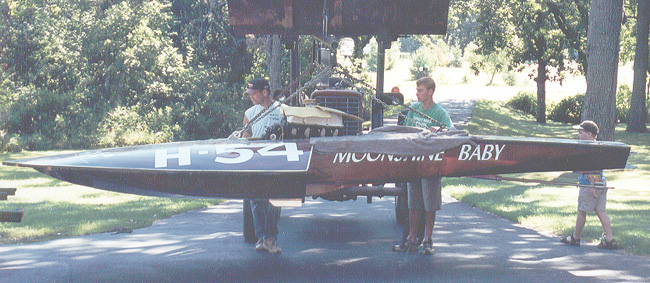
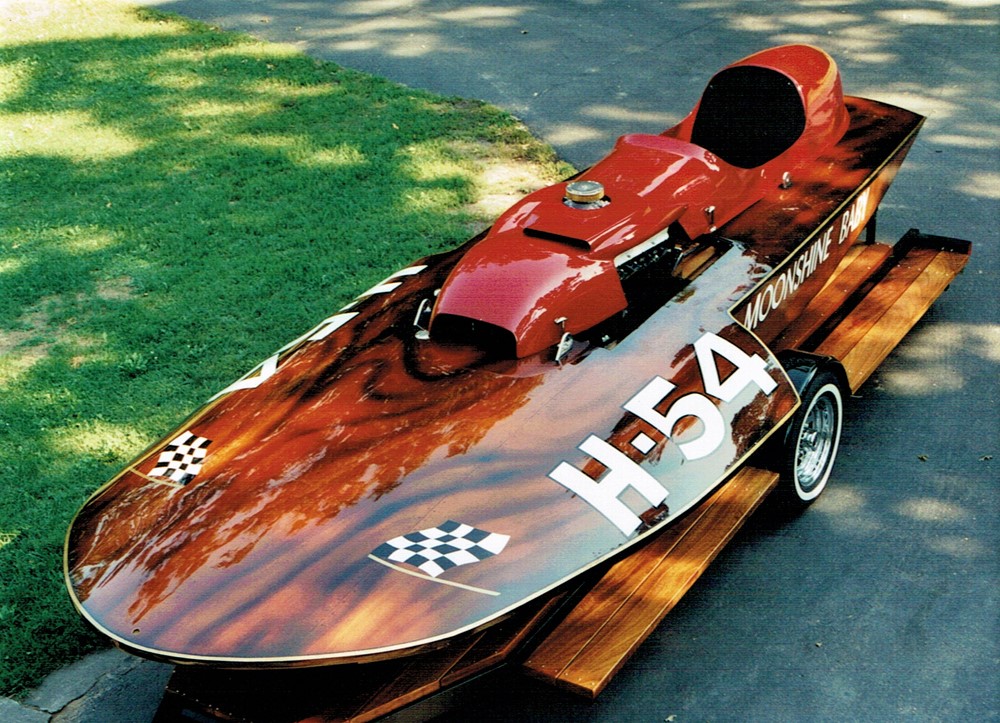
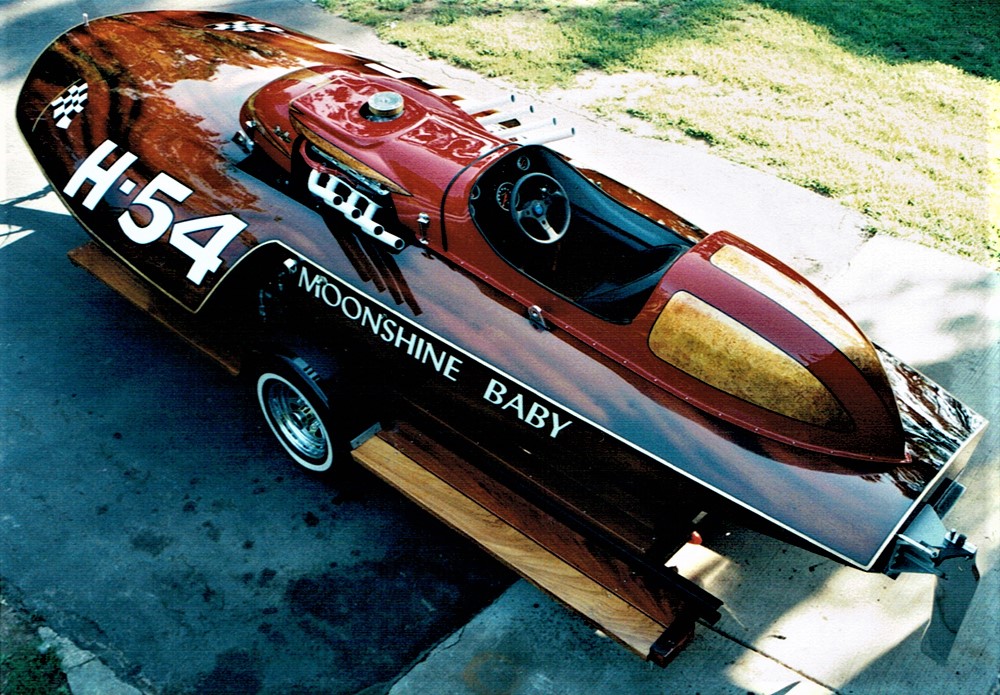
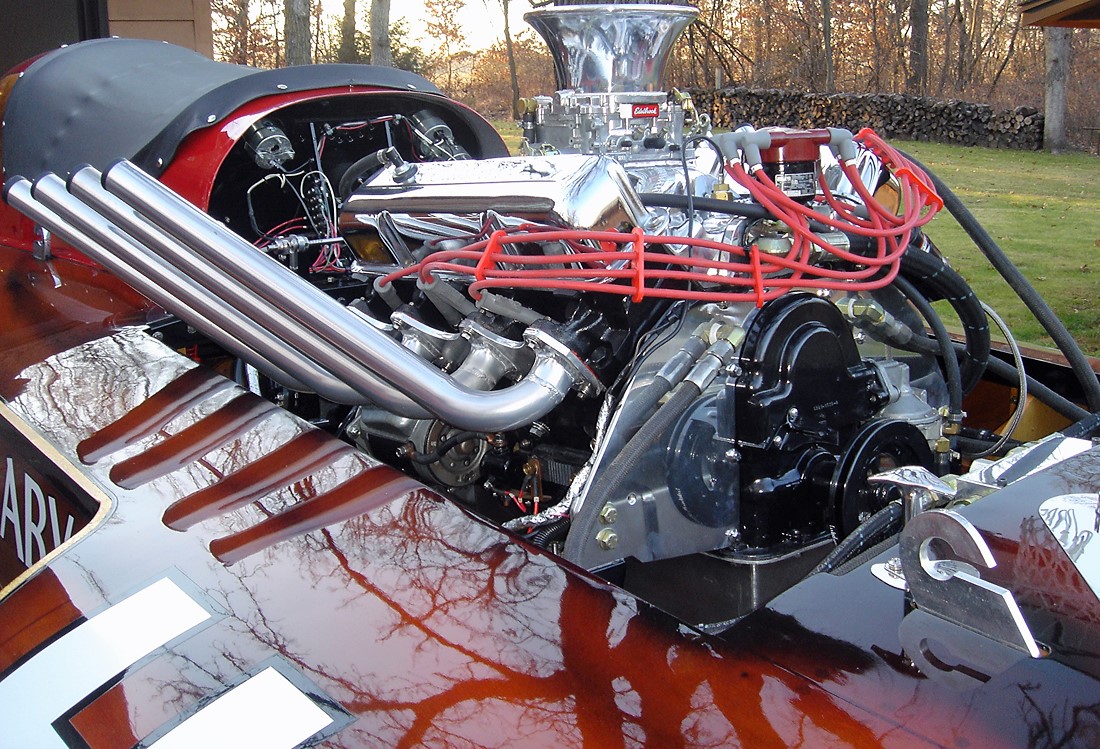
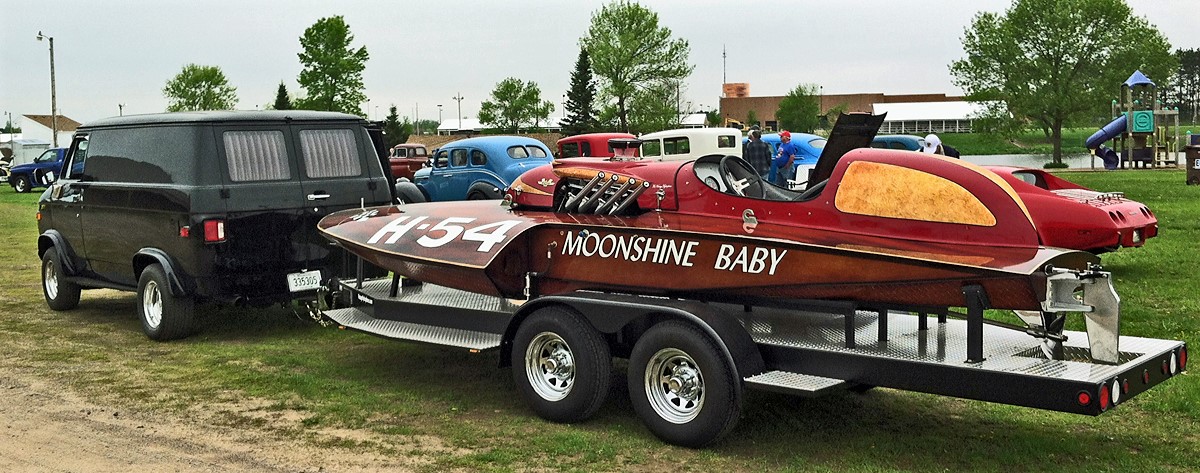
This photograph really sums up the differences from this hydro to any other hydroplane design by Ted Jones.
The original builders purchased 280 cubic inch class blueprints/plans from Ted Jones and they added three feet.
The 280 plans were for a 16' hydro. This 7-Litre tops out at 19' 2" in hull length.
Note the motor is placed almost entirely after the sponsons ends.
Another unique design feature of this hull - the beam of this hydro is just past 7'. A very 'skinny' 7-Litre class hydro that makes it a hydro that doesn't even need a tilt trailer that one would typically see carrying most Junior Gold Cup hydros.
I don't have the original blueprints, but studying other 280 class blueprints by Jones, it appears most of the 3' was added in the engine bay area. She is definitely a one of a kind.
|
|
 Was it worth all the work? Was it worth all the work?
It was for me!
|
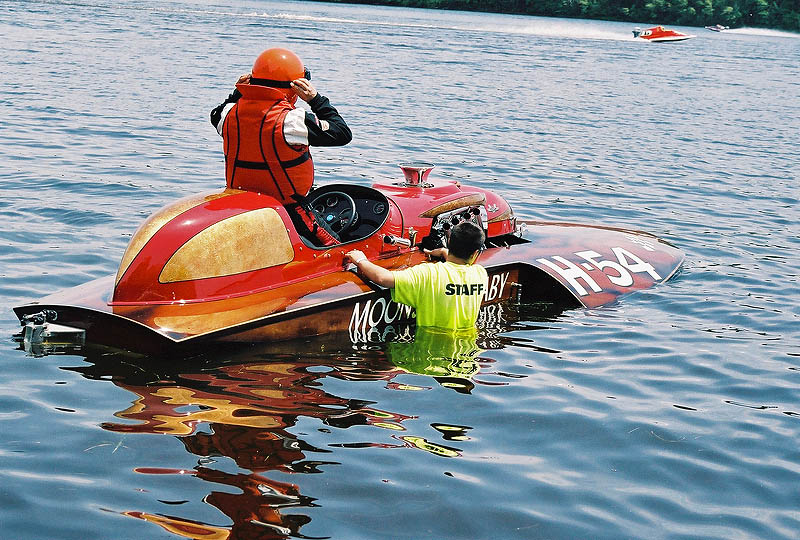
Maiden Run - 2005
September 17, 2005
Moonshine Baby and I take our maiden voyage at the Twin City Power Boat races at Moose Lake, Minnesota.
 After the run..... After the run.....
|
Below is the latest updates after 2 other event runs.
Motor was pulled and freshened up in 2006.
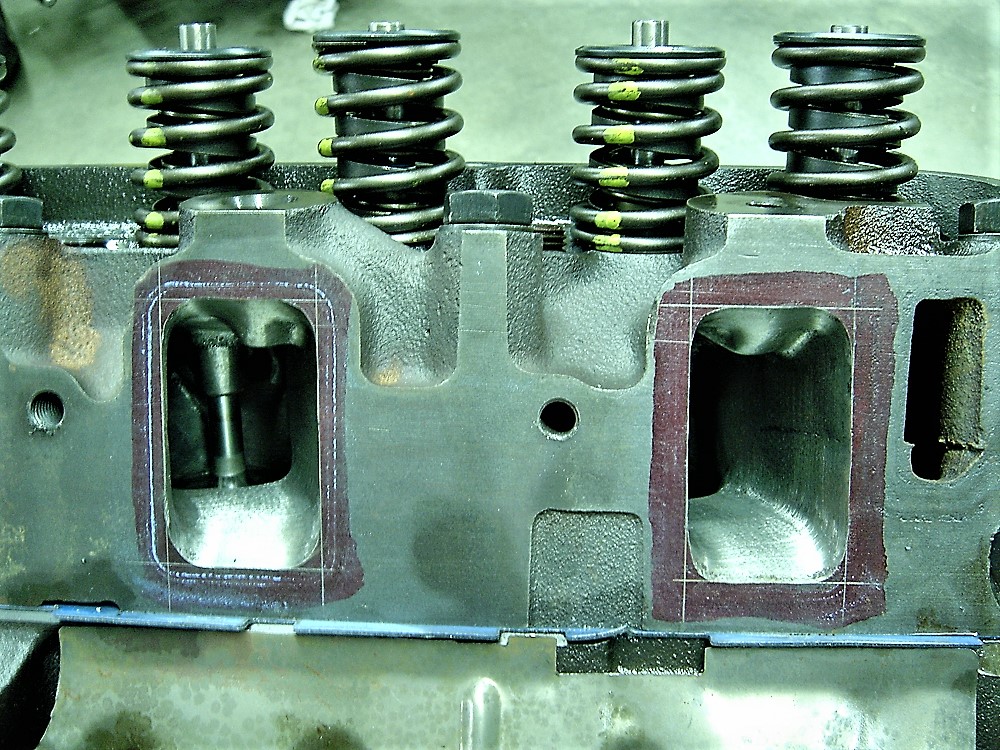
The heads were ported and aluminum roller rocker arms & spacers installed.
other work included:
• Sent out block and cylinder heads for cleaning and magnaflux
• Machine exhaust seats and install hardened seats for unleaded fuel
• Machine the valve guides for pc seals
• Machine all intake spring seats for better Comp springs
• Perform competition valve job on valves and seats
• Assemble heads with new springs, seals, retainers and locks
• Set up valve springs to proper shim height
• Hone block minimum with power hone (no boring required as it was in that great a shape). Everything still at factory bore specs.
• Clean and prep all components and prepare for assembly
• Polish crankshaft and check ok.
• Assemble short block with new main bearings, cam, cam bearings, rod bearings, rings, seals and gaskets.
• Install new oil pump assembly
• Installed and degree new Comp Cams camshaft to specs |
The last 3 runs - I kept breaking the weld on the log shaft/mid strut bearing underneath that Henry Lauterbach built me due to bent propshaft.
After rewelding the logshaft, replacing the bearing and seal and buying a new 1-1/4" prop shaft, all is back in place, aligned and good to go.
Other changes - I found an aluminum flywheel to get the motor to wind up faster. Motor oil evacuation system installed.
The gearbox was pulled, disassembled, the casings received ceramic powdercoating and new seals and bearings installed.
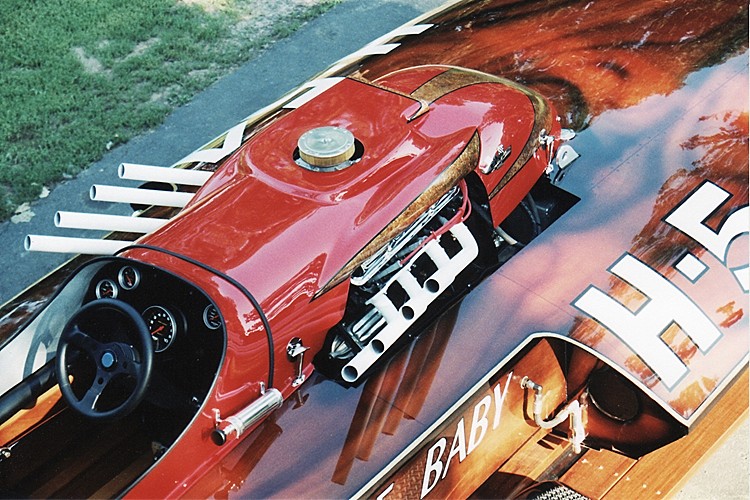
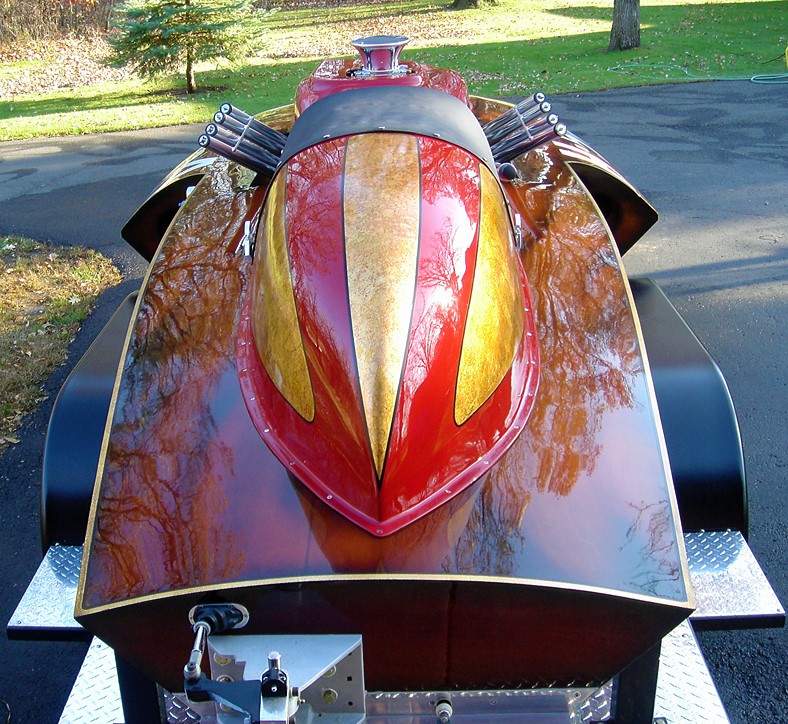
Top view
This photo shows the new aluminum front engine plate I made and aluminum timing chain cover installed after the motor was rebuilt.
This replaces the cast iron (heavy) unit that was in there when I originally set up the front motor mounts.
Timing pointer made and installed and fuel filter and lines rerouted to a new Edelbrock carb and aluminum intake,
to replace the stock (heavy @ 78 lbs.) cast iron intake that was also on the motor.
The zoomies have been sandblasted and repainted with a silver color ceramic coating (the white color before, failed bad).
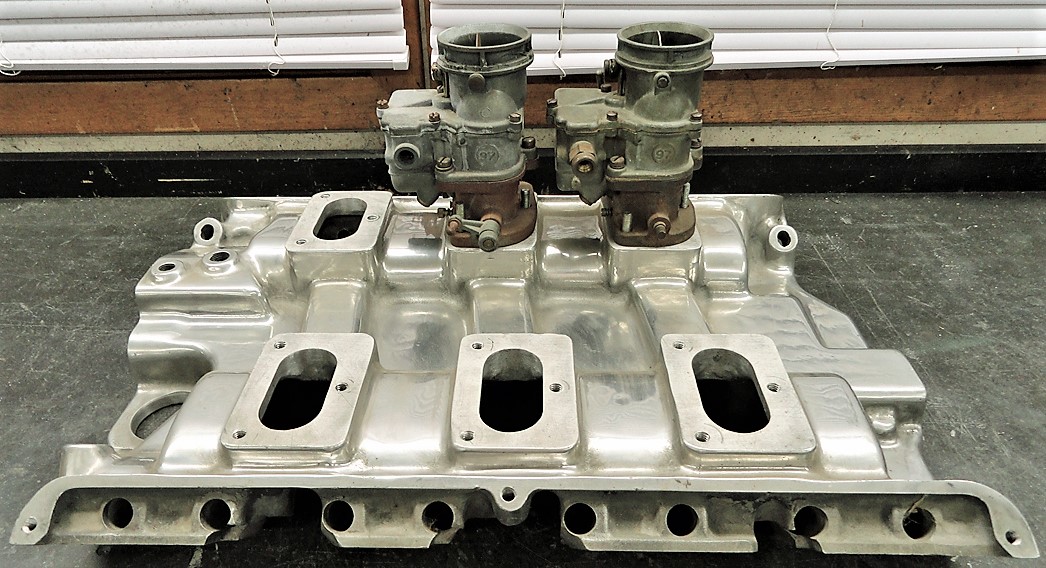
Vintage Edelbrock 6 deuce intake manifold (being polished).
One of these years, Moonshine Baby H-54 will have the 6 Stromberg 97 carb induction back in place.
During the winter of 2005-06, I built a NEW trailer.
Torsion spring suspension, HD axles, electric brakes, new tires and rims, polished diamond plate aluminum decking and L.E.D. lighting.
The spare tire mounts under the front decking via a cable lift mechanism (same one pickup trucks now have these days).
Parked on her new trailer.
Isanti County Fairgrounds - Memorial Day 2013
I finished a 5 year restoration of my 1975 Chevy Van (owned since I was 16) and hooked on the boat and showed it at the 37th Annual car show.
Thanks for visiting
© Phil Spruit
Back to the boats |
|
